| Сегодня 7 июля, вторник |
|
|
|
Какой рейтинг вас больше интересует?
|
Главная /
Каталог блоговCтраница блогера PSDTUTS/Записи в блоге |
|
PSDTUTS
Голосов: 2 Адрес блога: http://psdtuts.com Добавлен: 2008-10-26 20:48:58 блограйдером DrakAngel |
|
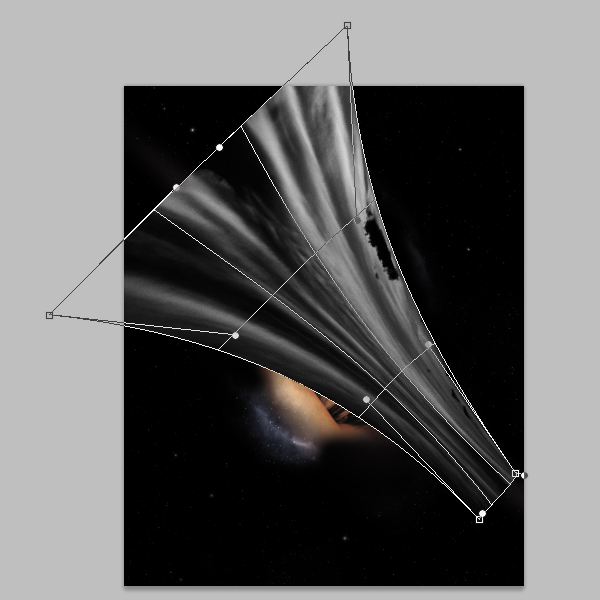
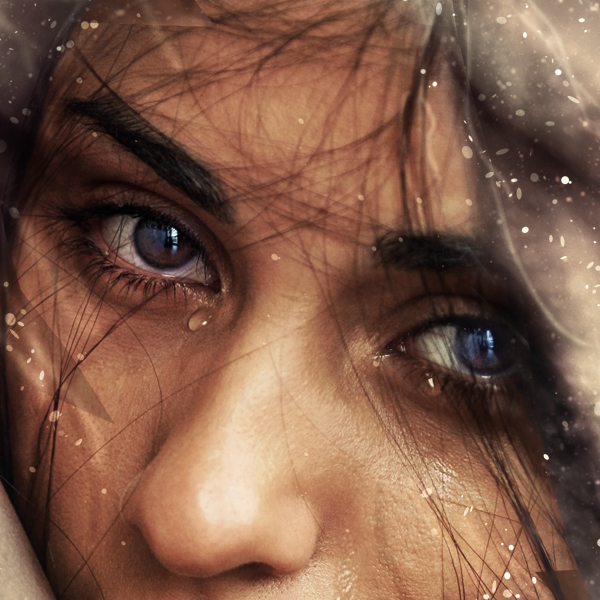
Create a Cosmic Photo Manipulation in Photoshop – Psd Premium Tutorial
2011-08-18 17:00:20 (читать в оригинале)In this Psd Premium tutorial, author Mart Biemans will be demonstrating how to combine photos and effects to create a cosmic photo manipulation in Photoshop. This piece was originally created for Design Against Child Slavery (DACS), a group of designers working to fight against the child slavery epidemic. This tutorial is available exclusively to Premium Members. If you are looking to take your design skills to the next level then Log in or Join Now to get started!
Professional and Detailed Instructions Inside
Premium members can Log in and Download! Otherwise, Join Now! Below are some sample images from this tutorial.
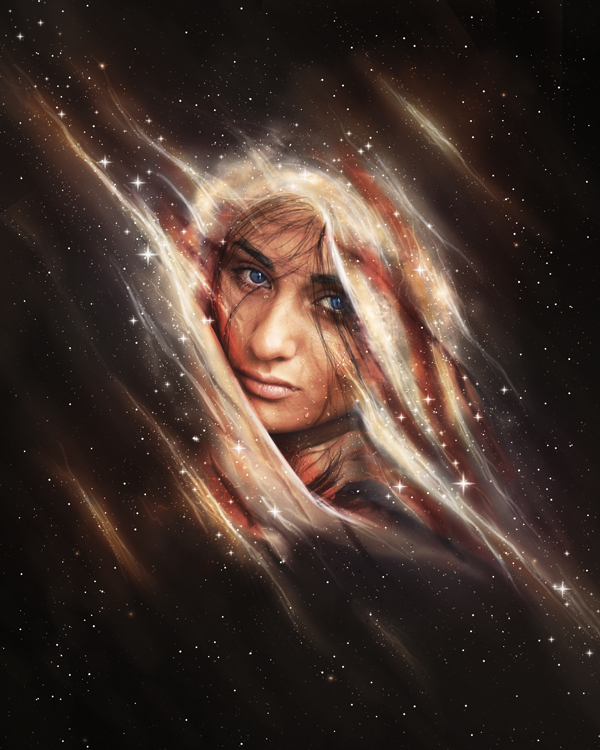
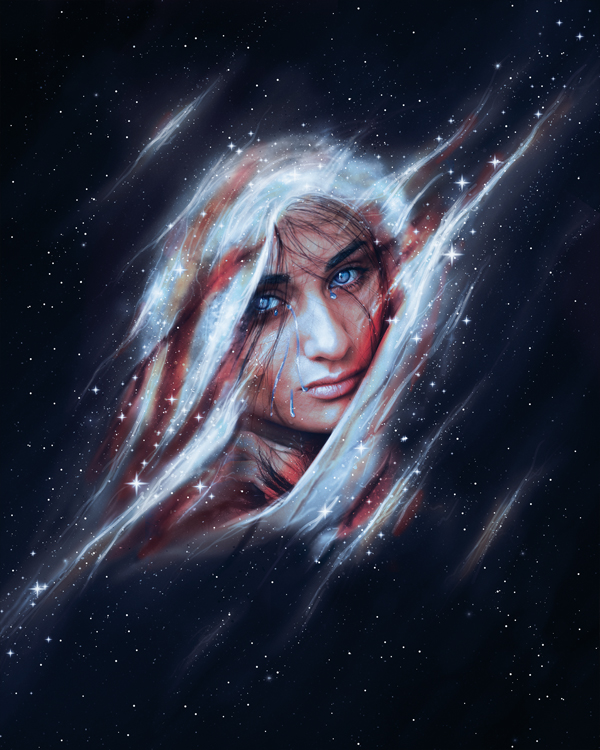
Final Image
Psd Premium Membership
You can join Psd Premium for as little as $9/month. Premium membership gives you access to the source files for all our tutorials as well as access to premium tutorials like this one. This also includes the rest of the sites in our network including Vectortuts+, Webdesigntuts+, Phototuts+, Nettuts, and more! Premium Members can Log In and download this tutorial. Otherwise you can Join Today!
PhotoDune – Envato Photo Marketplace
2011-08-18 09:23:41 (читать в оригинале)It’s been almost five years since we launched Envato, the company behind this site and many others, and in that time we’ve built eight digital marketplaces for everything from WordPress Themes to Background Music. With our fifth birthday coming up this weekend, we’re excited to announce the beta launch of our ninth marketplace: PhotoDune for royalty free stock photos.
Connects to Other Envato Marketplaces
 Like all our marketplaces, this one allows you to use your regular Envato Marketplace account and cash to make purchases. It also has the same familiar interface that you are used to with some new upgrades to search and browsing to cater to the photo market!
If you haven’t got an account yet, you can sign up here.
High Quality, Affordable Prices
Prices for a regular license on photos go from $1 to $9 depending on the size of photo you are buying. That’s incredibly affordable, and what’s more, the level of quality you’ll find on PhotoDune is extremely high. Check out our Top Sellers, or a few of my favourite images below:


Selling on PhotoDune
If you are a photographer interested in selling with PhotoDune, be sure to check out leading industry blog Microstock Diaries’ write up Envato Enters Microstock with PhotoDune and visit PhotoDune to Get Started Selling Your Work.
The Future of the Envato Marketplaces
With our ninth marketplace out, on the eve of our fifth birthday, and with our millionth member milestone in sight for later this year, you might be wondering what’s in store for the Envato Marketplaces?
Over the years we’ve had thousands of authors generate a whole lot of earnings through these sites, with the first one set to break into our million dollar Power Elite group fairly shortly. This community of authors has only gotten stronger and stronger and has become the bedrock of our marketplaces.
Ultimately our mission is always to serve our community, both of authors and buyers. We’re doing this by creating what we hope will be the largest set of creative marketplaces online. Despite having nine marketplaces out, there is a list just as long of new frontiers to explore! There are after all plenty of other things people want to sell!
With each passing year the momentum and community size swells, and this means the marketplaces become ever more effective ways to sell your content. We’ve upped our rates three times in the past so that we can offer our authors a good return on their work, and just as importantly, we offer a happy and vibrant community life to go with it.
So I hope that whether you are a buyer or an author you find PhotoDune useful, and that in years to come we’ll be rocking the photographer success stories from our newest marketplace!
Sketching the Human Form in Photoshop
2011-08-17 17:00:31 (читать в оригинале)Photoshop is an excellent tool for manipulating photographs but it can also be used as a means to create stunning digital art. This tutorial is part of a 25-part video tutorial series demonstrating everything you will need to know to start producing digital art in Photoshop. Digital Art for Beginners, by Adobe Certified Expert and Instructor, Martin Perhiniak will begin by teaching you how to draw in Photoshop. At the conclusion of this series you will know all you need to produce your own concept art and matte paintings in Photoshop.
Today’s tutorial Part 5: Sketching the Human Form in Photoshop will demonstrate how to create your sketches digitally in Photoshop with a focus on how to draw the human form (with or without a reference). We will also point out some resources that you can use to help you out along the way. Let’s get started! Editor’s note: This tutorial includes some nudity meant to help you draw human forms.
Fan Art From Popular Nerd Franchises
2011-08-16 17:00:20 (читать в оригинале)There are no shortages of nerdy movies on the big screen these days. In this web round up we will feature some of our favorite fan art from some of your favorite nerd franchises. Pieces included in this showcase will include Star Wars, Star Trek, Transformers, and many more. Please take a moment to review this fantastic showcase of nerd fan art.
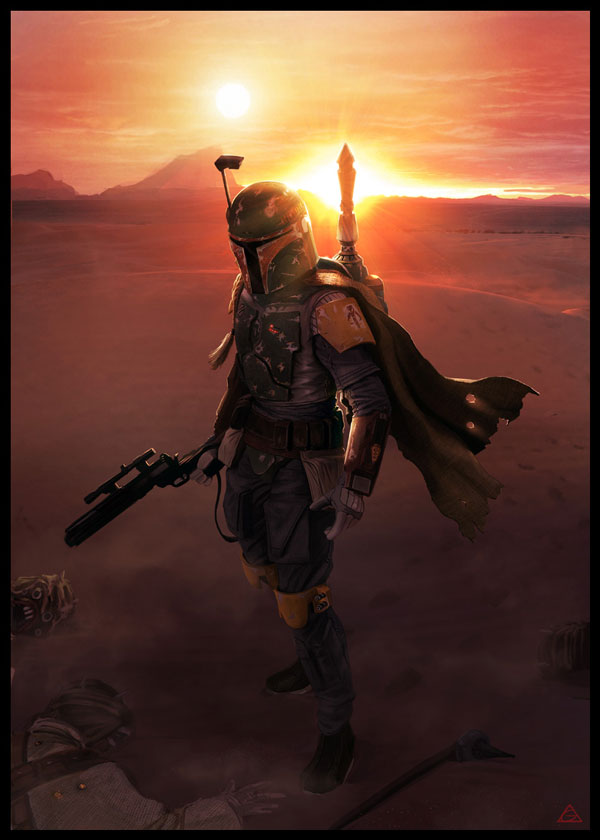
Boba Fett by Jamga
We start this collection off featuring an awesome painting of everyone’s favorite space bounty hunter Boba Fett. The painting itself is stunning with an equally amazing backdrop. The details on Fett are just as great as the whole atmosphere.
Star Trek TOS Away Team by Dennis Budd
The 3 most popular members of the Star Trek cast are seen here in this piece of fan art. The comic book style of illustration definitely gives it a fresh look since we have never seen these guys in a comic.

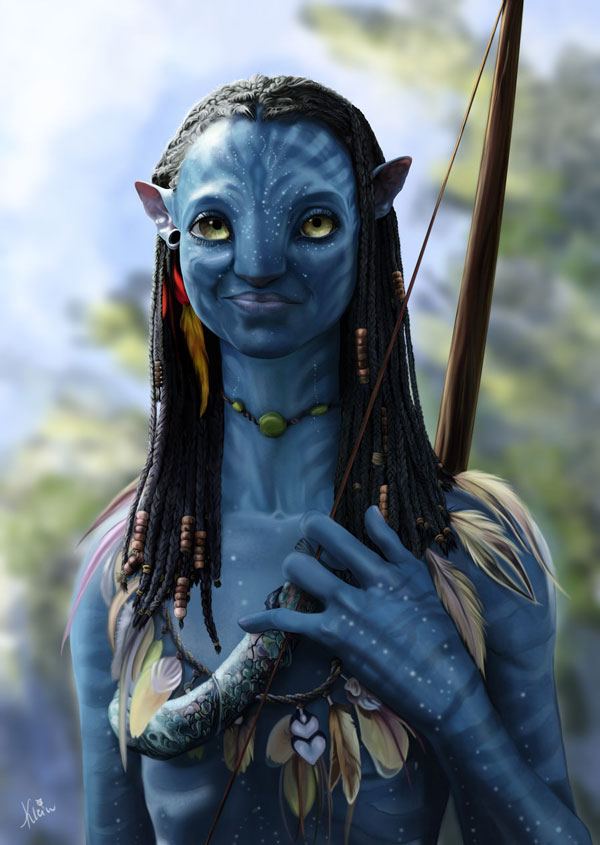
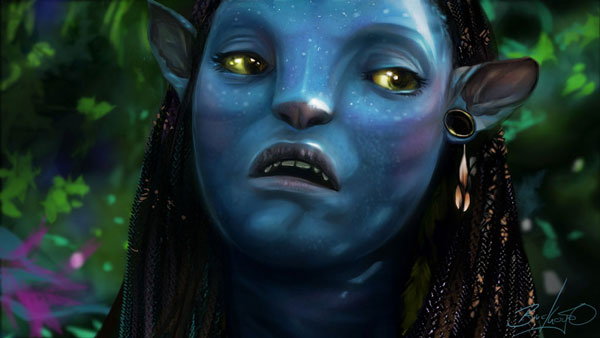
Neytiri by Okiran
Many digital painters love drawing and illustrating the characters from Avatar, and when looking at this specific piece we can see why. All the markings and textures of this alien race lead to a very interesting painting that when executed correctly can look amazing, and this is a great example.
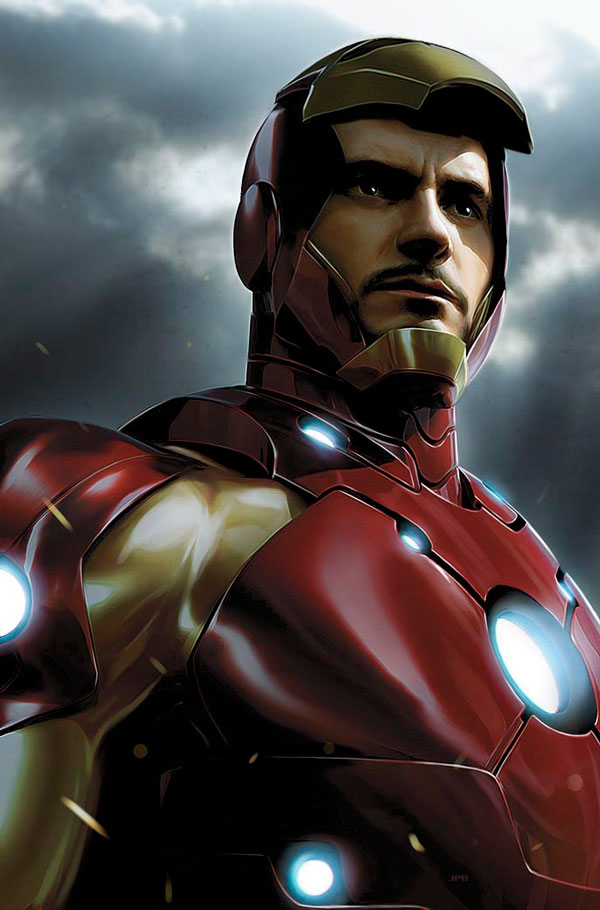
New Iron Man by Jeremy Roberts
Robert Downey Jr. As Tony Stark or Iron Man is seen here. This portrait does it job perfectly, give the viewers a look at the new Iron Man they will be seeing in theatres quite frequently, the element of realism also makes this painting top notch.
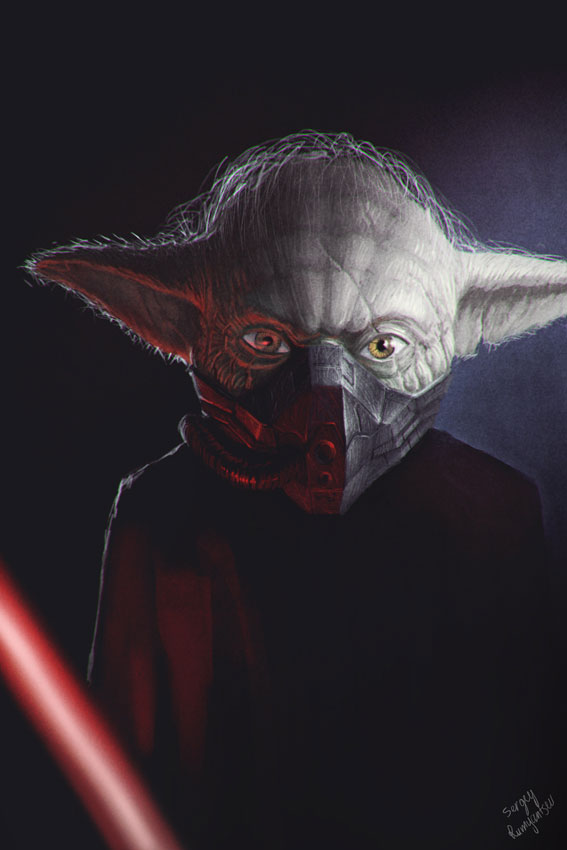
Naughty Yoda by Sergey Rumyantsev
Art is where people can get very creative and unique and this is a cool example. One Star Wars fan asked the question; what if Yoda went to the dark side? And this is the result, great execution with a funny idea.
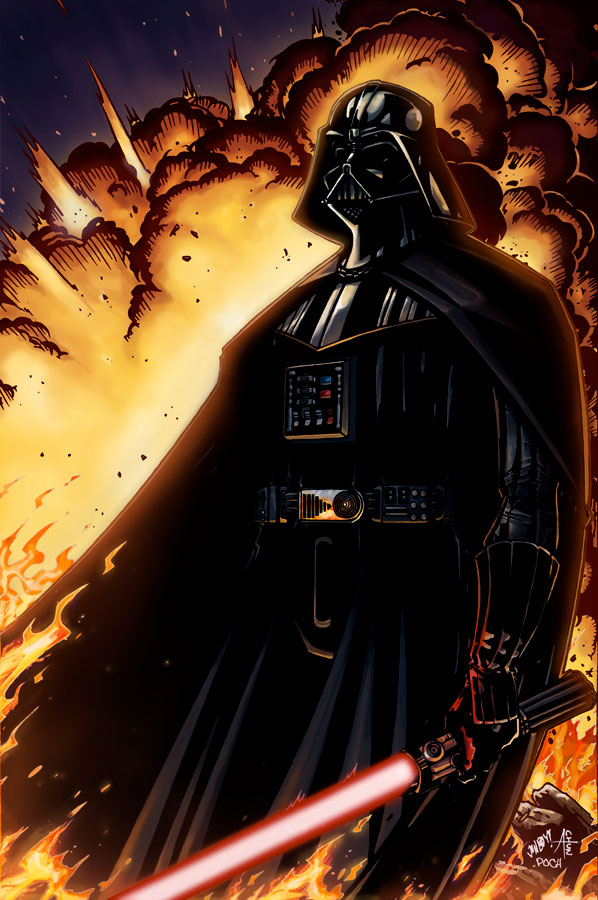
Jonboys Vader by Phil Porchrzast
Moving on in the Star Wars universe we can see the real Vader in this illustration which once again features a comic book style of drawing and coloring.
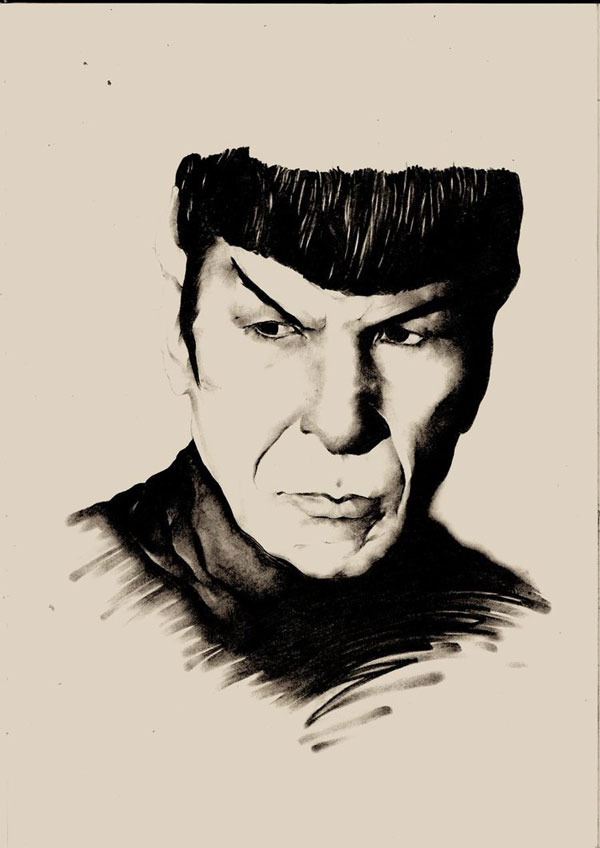
Satin Himself by Darcey Skelly
This simple yet effective portrait features none other than Spock of Star Trek. The painter captured the expression perfectly and did a great job with the whole painting.
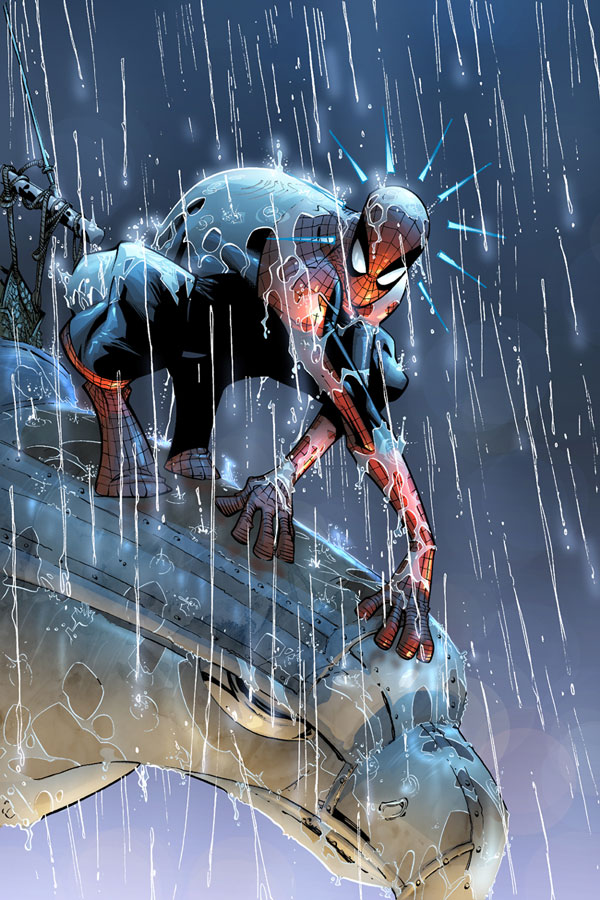
Spectacular Spiderman by Edgar Delgado
Peter Parkers Spidey Sense is going off in this illustration. We are accustomed to seeing this hero in a comic book setting so we are not surprised by that, but the illustrator still does a fantastic job with the coloring and overall execution.
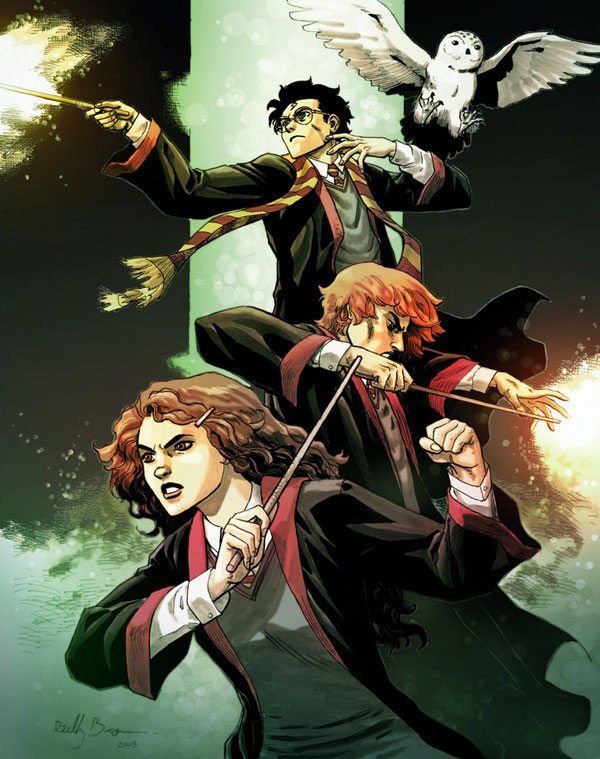
Harry Potter by Reilly Brown
With the Harry Potter franchise coming to an end soon it is fitting to add this piece of fan art to the collection. Although not as realistic looking as some would like this is still a solid group painting of the three wizards.
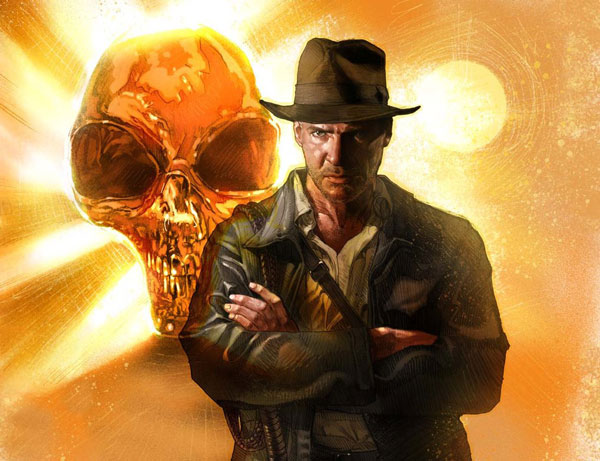
Indiana Jones by Renato Guedes
The latest Indiana Jones film gets the fan art treatment here with a simple piece. The detail and coloring put into this painting really make it stand out, overall a solid piece.
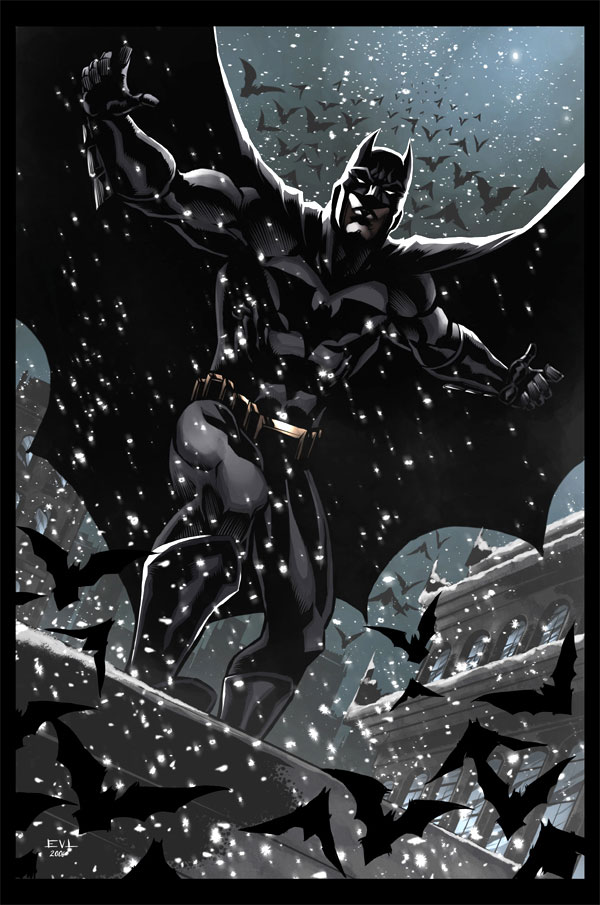
Batman Forever by Erik Von Lehmann
The Dark Knight is featured in this piece of fan art and is looking very sharp. The whole scene looks fantastic as the iconic bats flutter around the even more iconic hero. The dark tones used really give this piece a feeling of darkness when it’s all put together and that’s what makes it awesome.
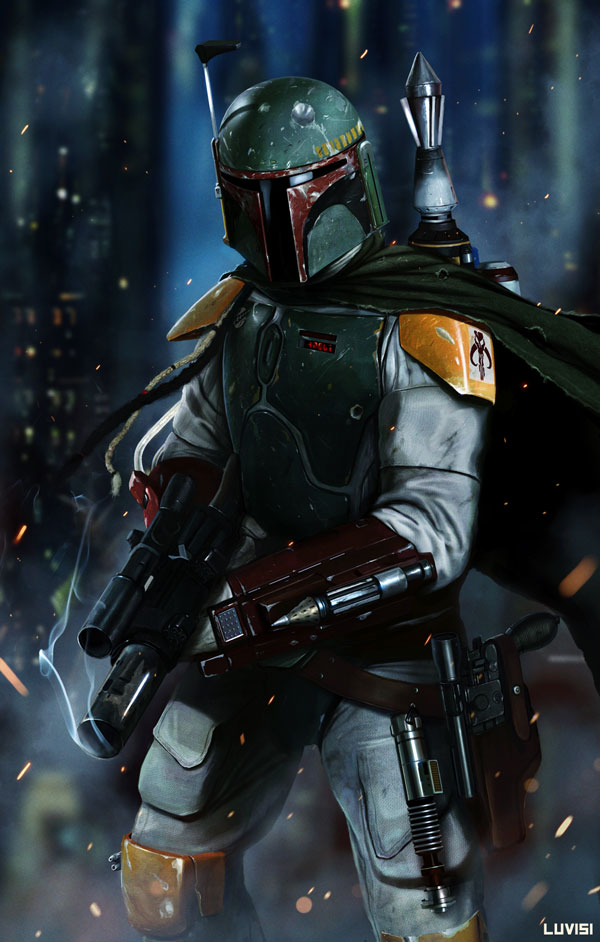
Boba Fett by Daniel LuVisi
More Boba Fett fan art for the Star Wars fans, and this one doesn’t skimp on the detail. Digital painter Daniel LuVisi never seems to disappoint with his extremely detailed paintings and this one is just another example of fantastic fan art.
Avatar by Simon Buckroyd
Here we have some more Avatar fan art and it features an array of beautiful vibrant colors that are blended together to perfection.
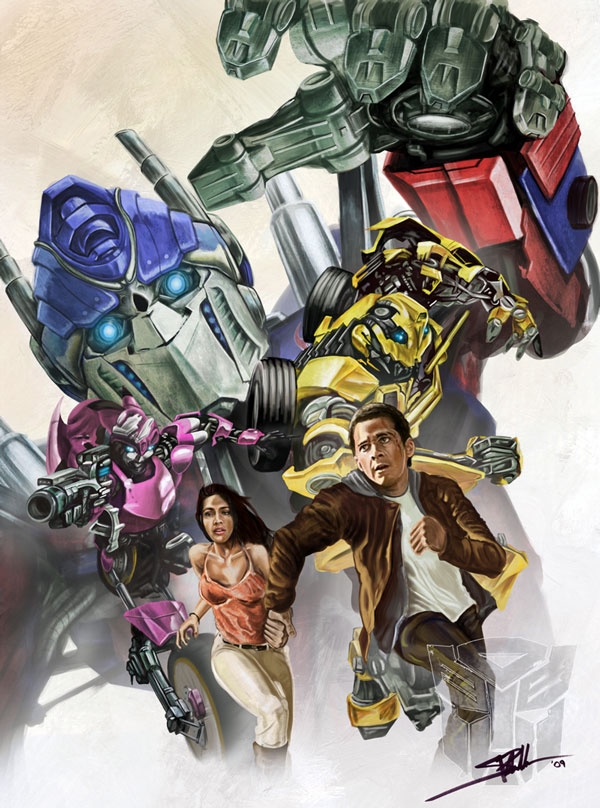
Transformers by Shane Madden
This piece of Transformers fan art looks a lot like a movie poster but no one is complaining when it looks this great. All the colors are on point as well as all the detail in every character featured in the painting.
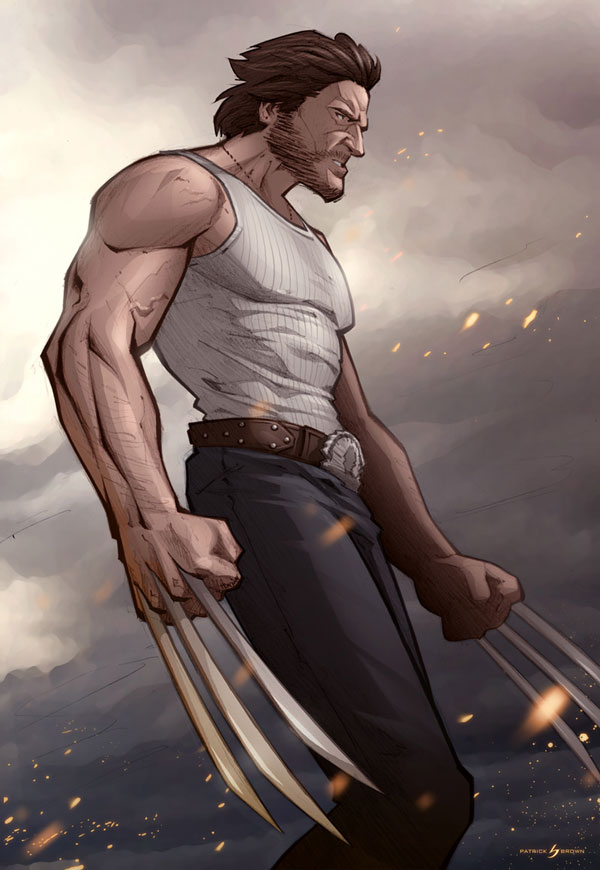
Wolverine by Patrick Brown
A bit of Wolverine’s origins are seen here in this painting. Although its a bit more cartoonish than we are accustomed to with Wolverine Origins artwork this still does the job perfectly as it conveys emotion from the hero while still having fantastic composition in the painting itself.
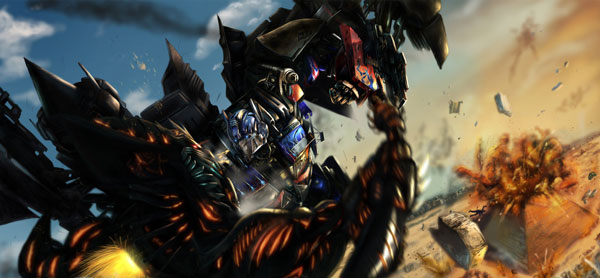
Transformers by Spirapride
This huge Transformers painting features a stunning scene of two massive robots fighting. This action shot from one of the movies looks amazing when seen in full resolution so make sure to head over to the DA page and check it out in all of its glory.
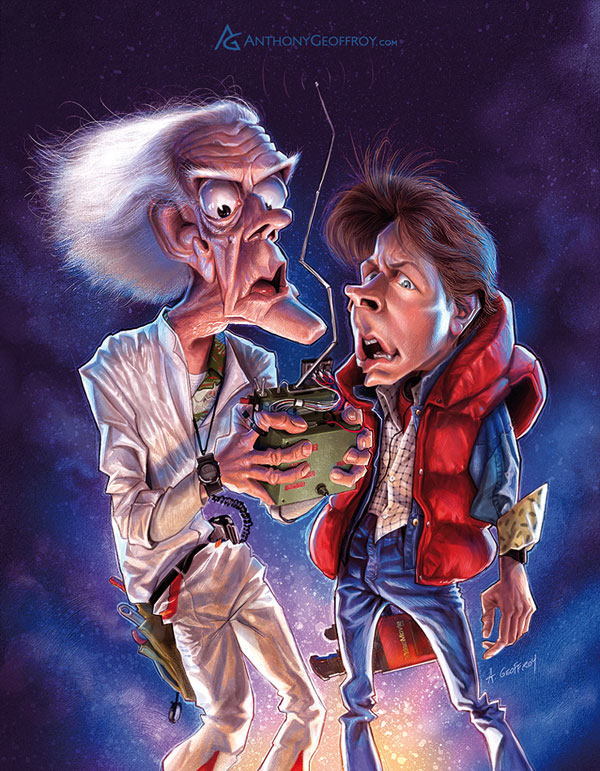
Back To The Future by Anthony Geoffroy
Our two favorite time travelers are seen here in an amusing caricature. Even though its intended to go over the lines of realism the artist still does a great job adding in detail after detail to give them a lively look even though they are all disproportionate.
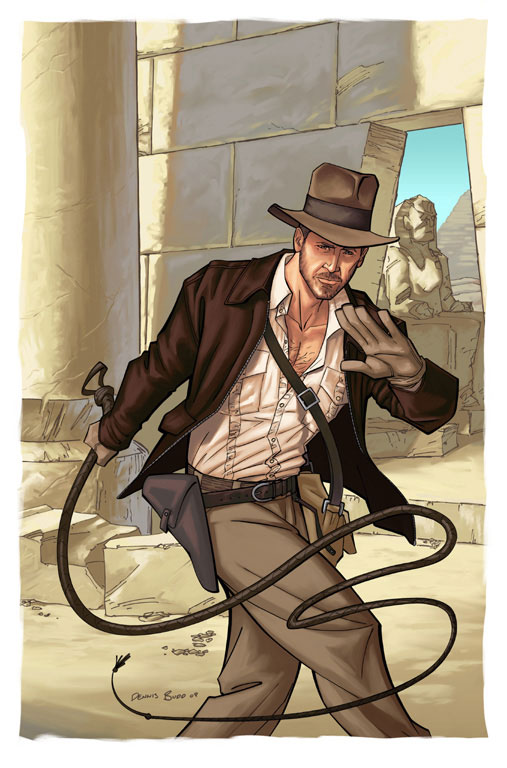
Indiana Jones by DennisBudd
The famous Indiana Jones whip is featured here in this piece of fan art. Once again we see the all-popular comic book style of painting; the designer still does a great job to capture the action of the whip as well as give us some cool Egyptian backdrop to look at.
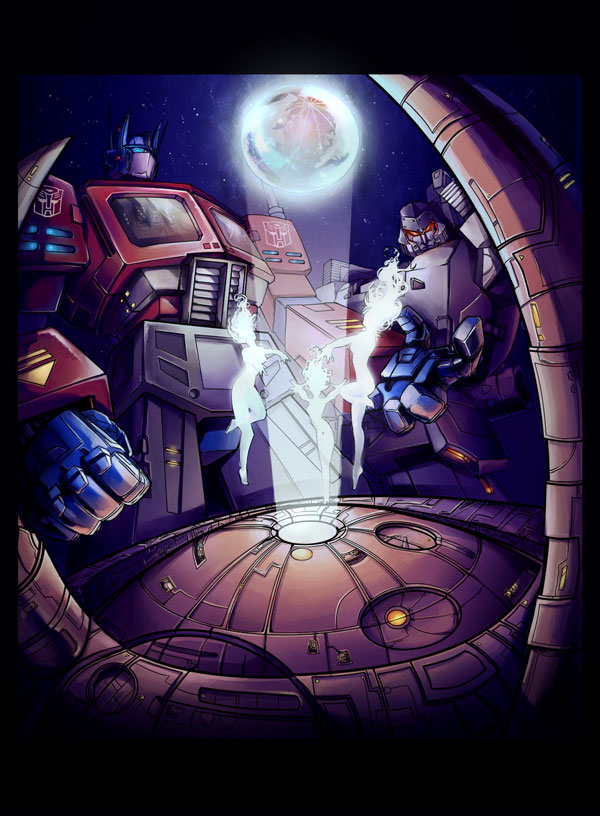
Transformers G1 by SiegeRedwolf
This cool futuristic looking piece of fan art gets featured because of the great overall execution of the piece. Optimus Prime is painted to perfection along with the rest of the setting in this scene.
The Future, The Future by RayFunNoey
Lastly we feature some more Back to The Future fan art and this one is very vibrant and colorful. The artist does an amazing job at picking these sharp and bright colors and then mixing them into the back while showcasing the two main stars. This is another great piece of fan art.

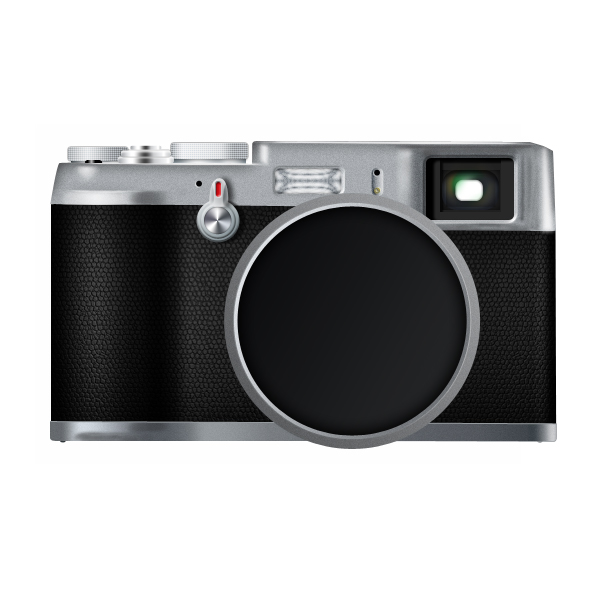
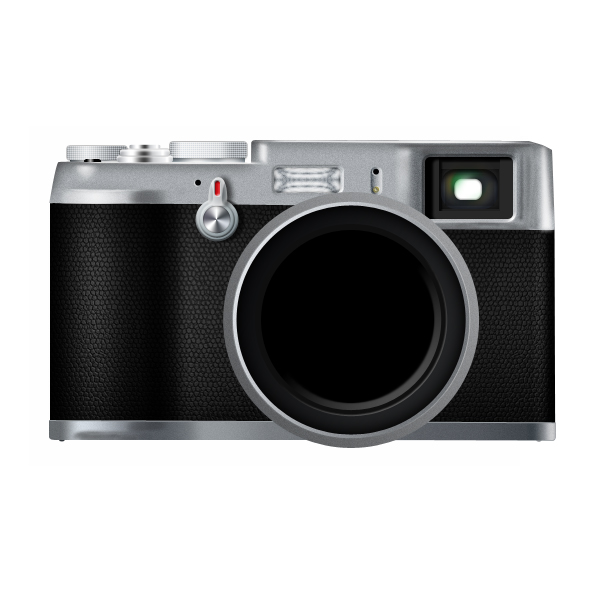
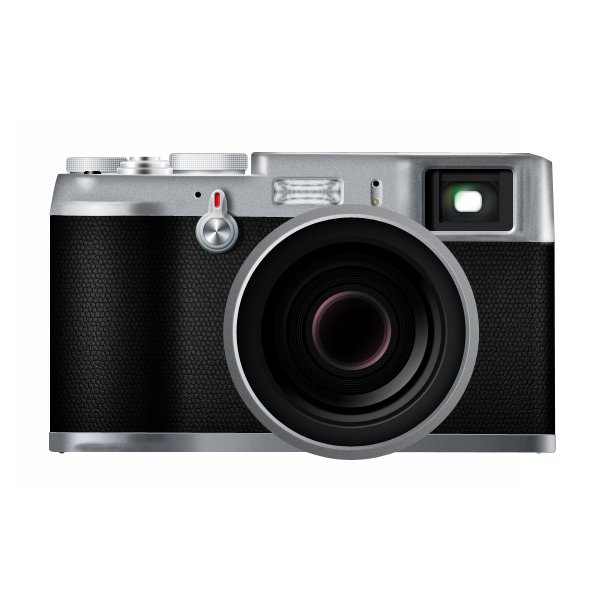
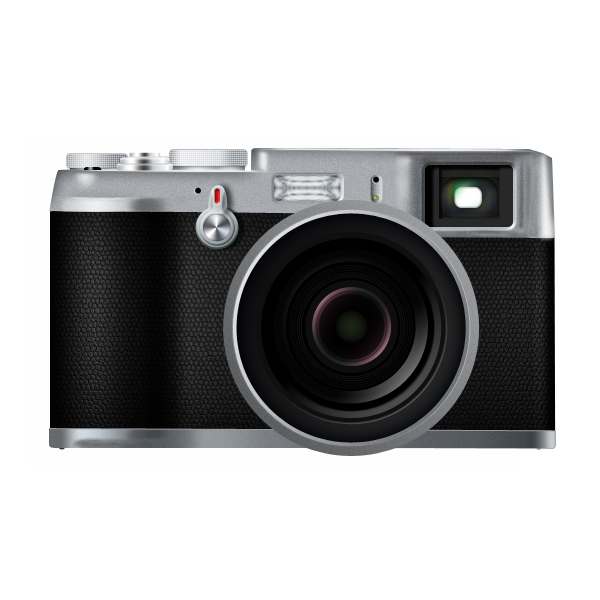
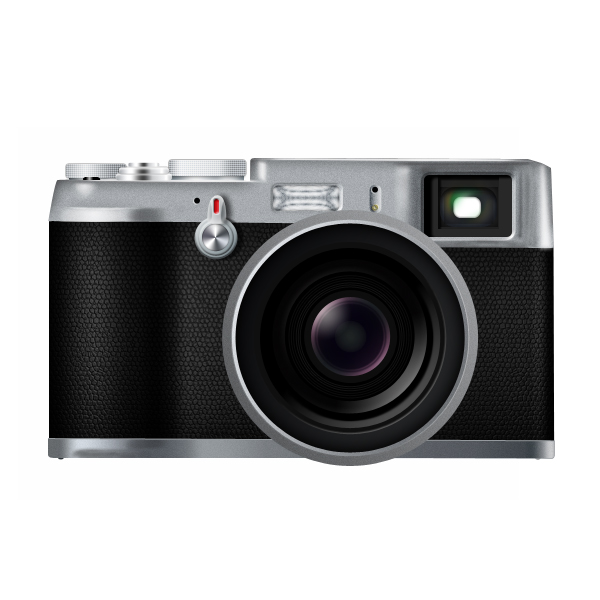
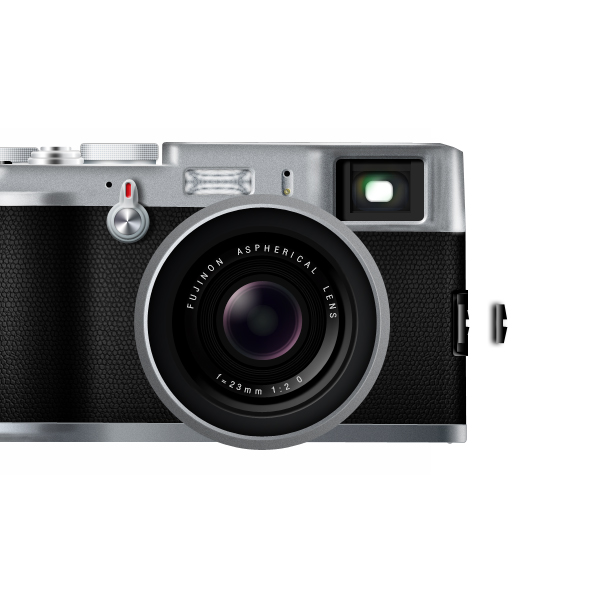
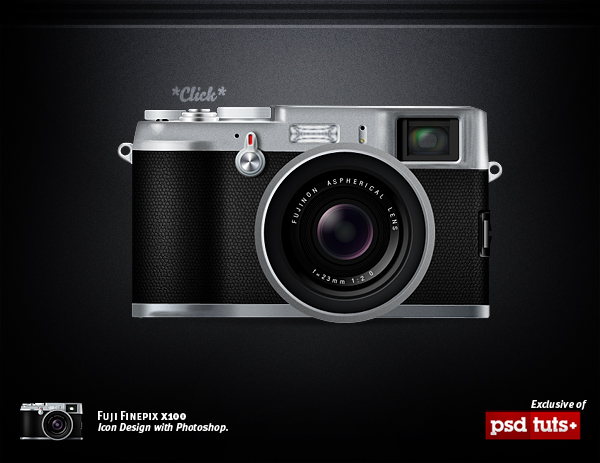
Create a Detailed Camera Icon in Photoshop
2011-08-15 17:00:39 (читать в оригинале)Icons can be a lot of fun to create. Simple icons are relatively easy to create but more realistic icons can be quite challenging. In today’s tutorial we will demonstrate how to create a detailed Fuji X100 camera icon in Photoshop. Let’s get started!
Tutorial Assets
The following assets were used during the production of this tutorial.
- Fuji Image
- Leather Tutorial
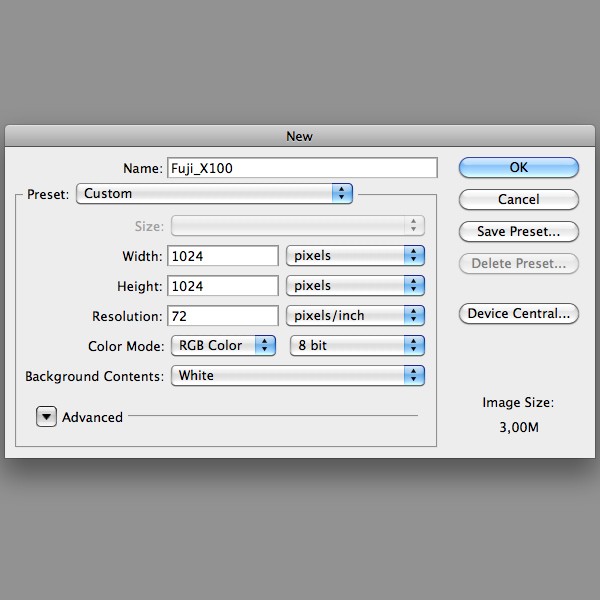
Step 1
Open a new document in Photoshop. Set a resolution of 1024×1024 pixels.
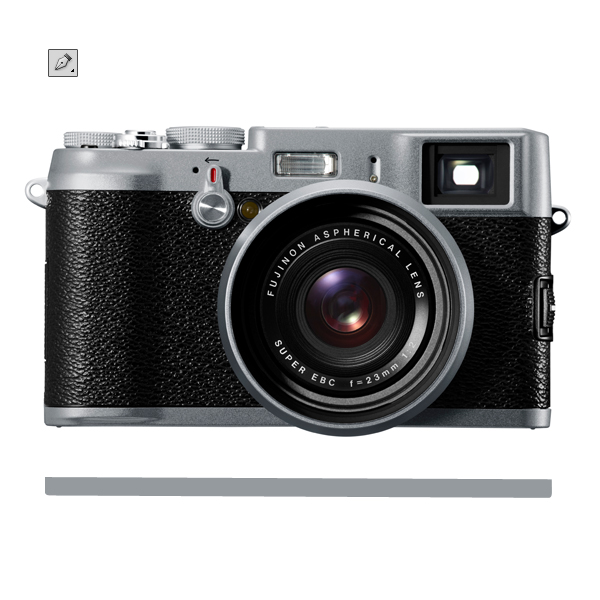
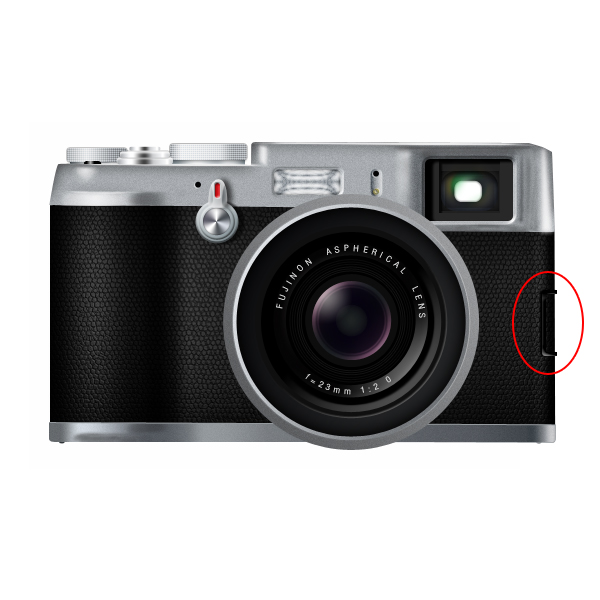
Step 2
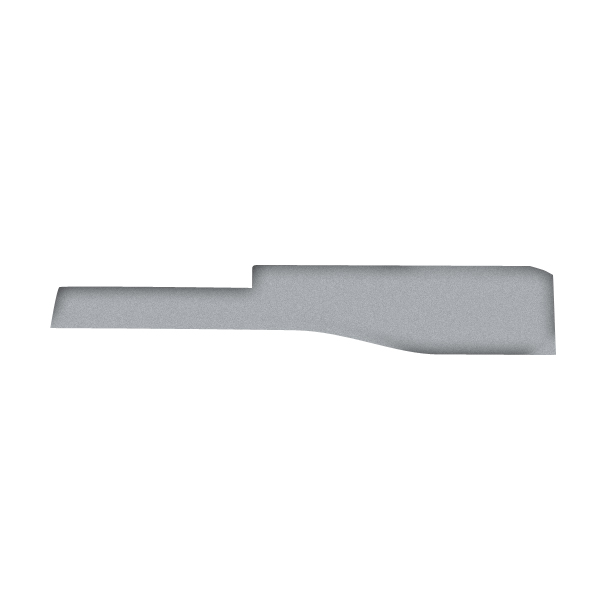
Then insert the image reference for the camera. With the Pen Tool (P) begin to trace the metal bottom part.
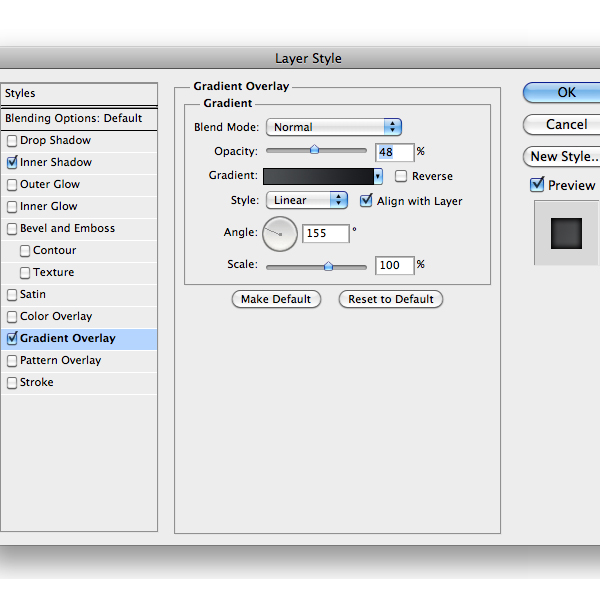
Step 3
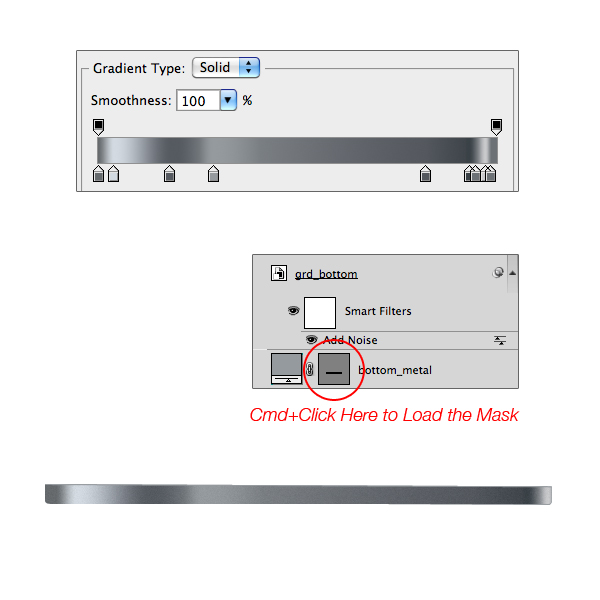
Load the metal layer as a selection by pressing Command/Ctrl and clicking on the vector mask in the Layers Palette. Add a new Gradient Adjustment Layer with the following style. Then convert the gradient layer into Smart Object and add some noise with Filter > Noise > Add Noise.
Step 4
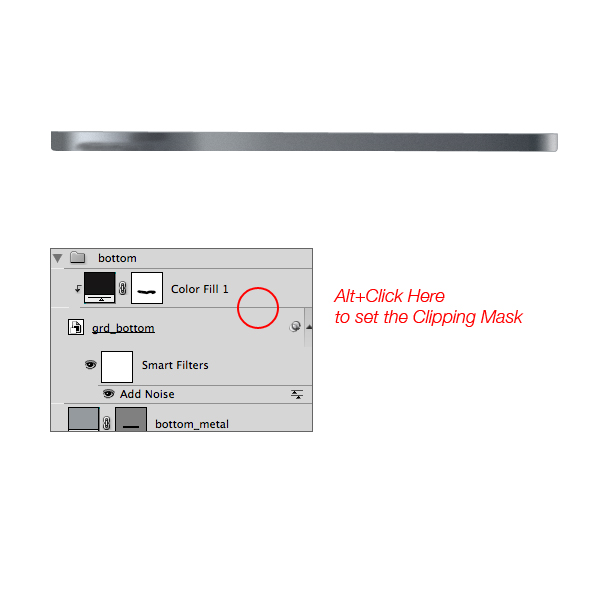
Add a Color Adjustment Layer and select black. Then with the Brush Tool (B) paint into the layer mask with a soft brush to create the metal shadows as the image below. To achieve a better result decrease the brush opacity. Set the layer as a Clipping Mask.
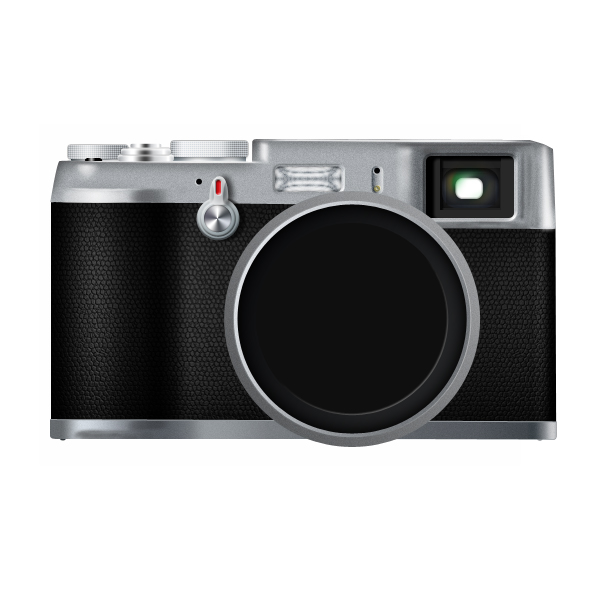
Step 5
For the upper metal part do the same as the bottom part (Step 3-4) but this time do not use the Gradient Adjustment Layer. Use a Color Adjustment Layer instead. This is because the metal reflections are a bit more complex.
Step 6
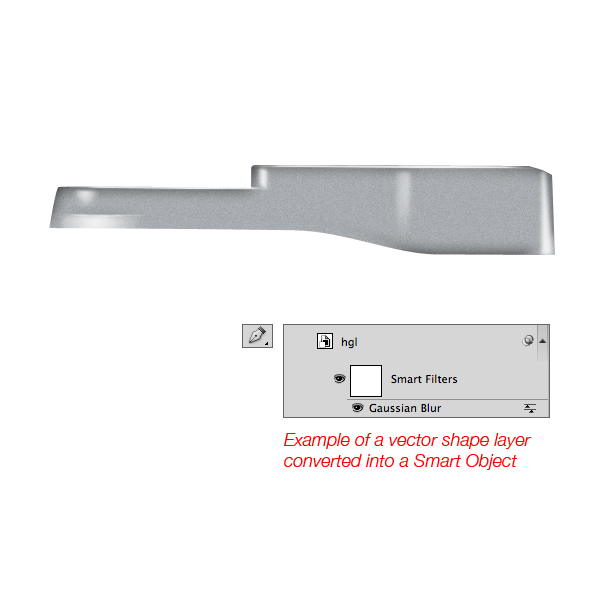
To create the upper metal reflection select the Pen Tool (P) and trace a white basic shape. Convert it into a Smart Object and add a Gaussian Blur Filter in Filter > Blur > Gaussian Blur menu. You have to repeat this process for the other reflections. As you can notice I’ve add a little drop shadow Layer Style in a reflection on the left part. Try to decrease the layer opacity too.
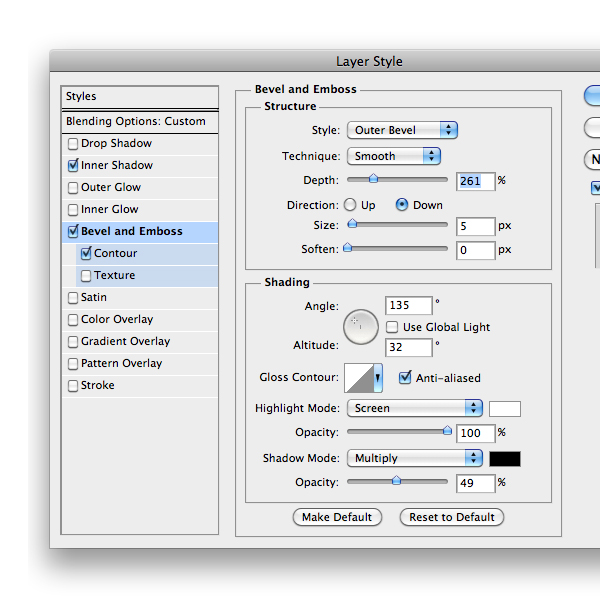
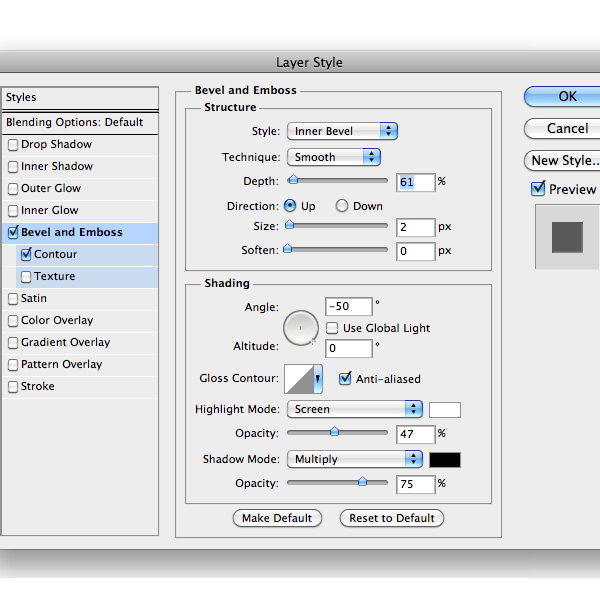
Step 7
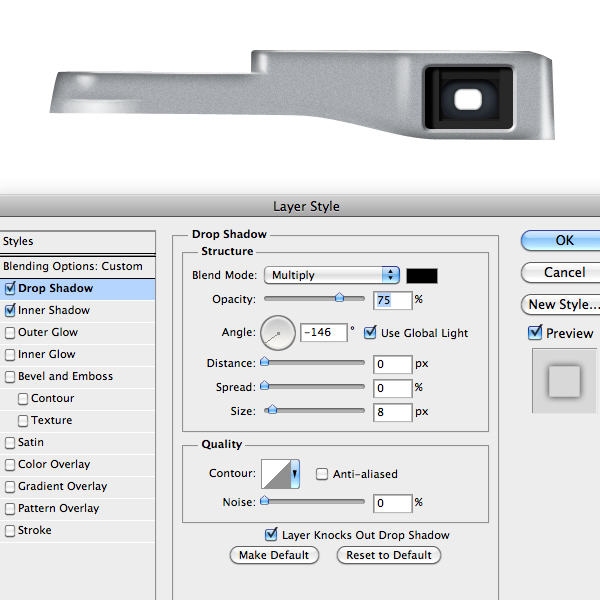
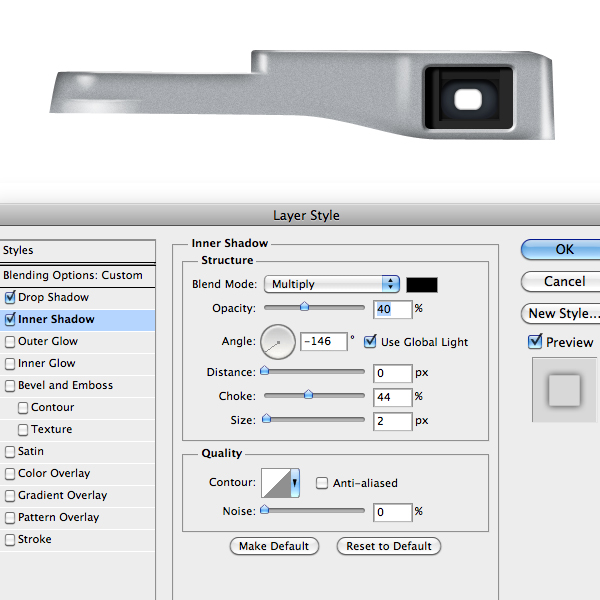
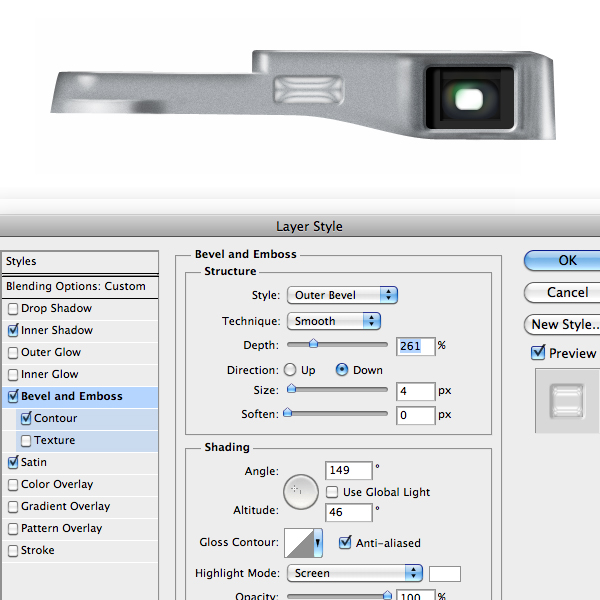
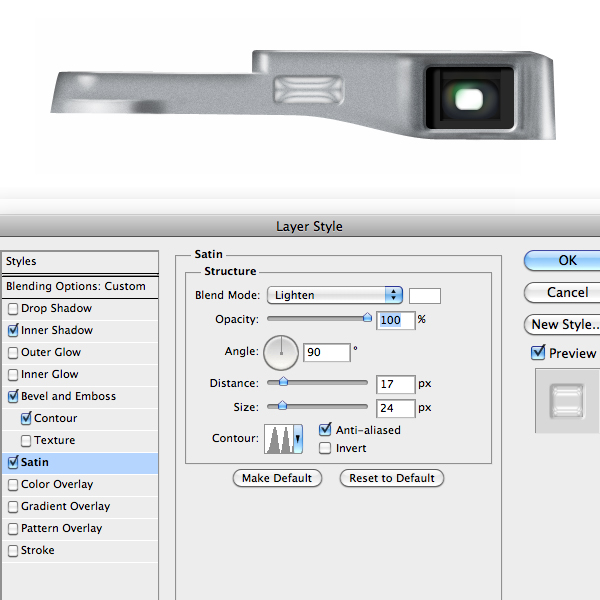
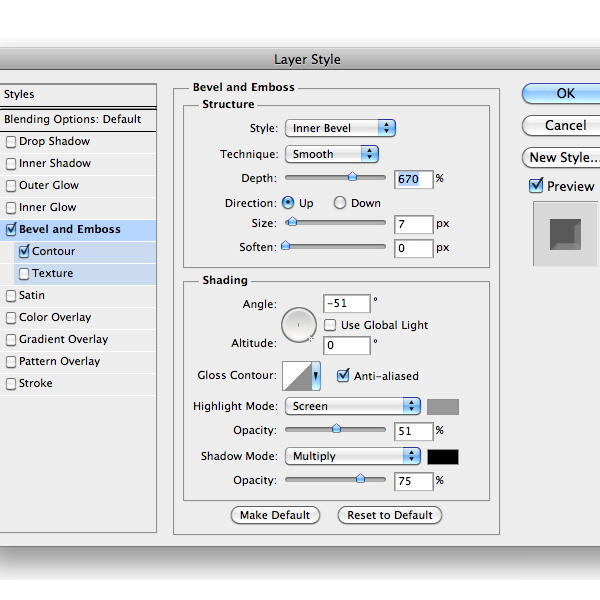
The viewfinder is composed by two main parts. We’ll begin with the outer part. With the Rounded Rectangle Shape Tool (U) draw a rectangle with a dark gray color as below and add the following style.
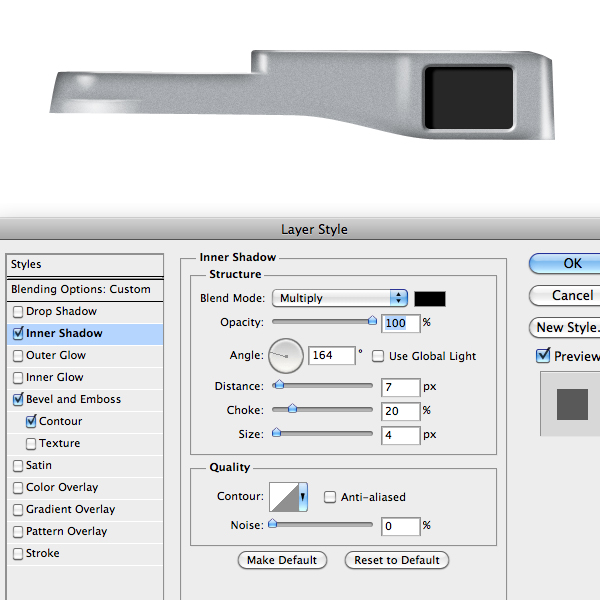
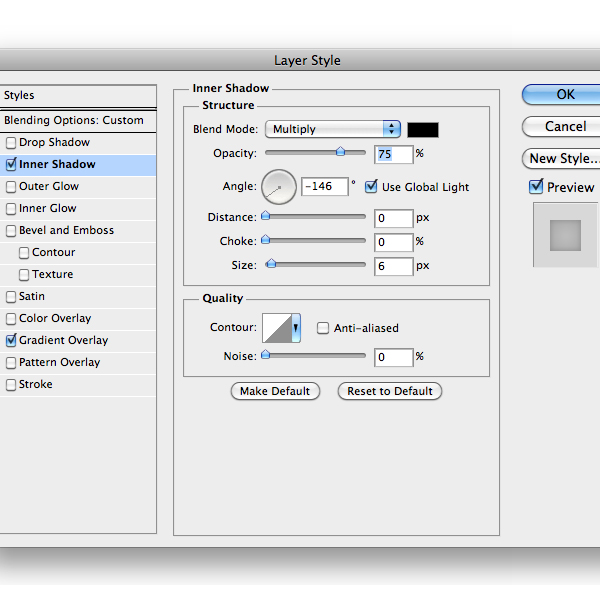
Step 8
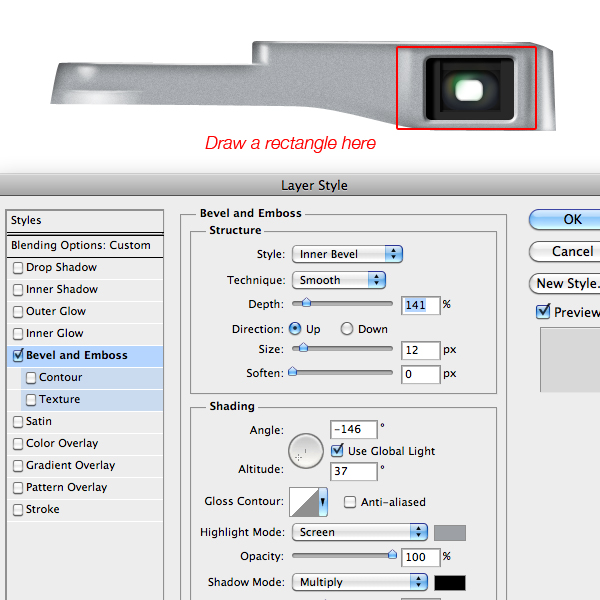
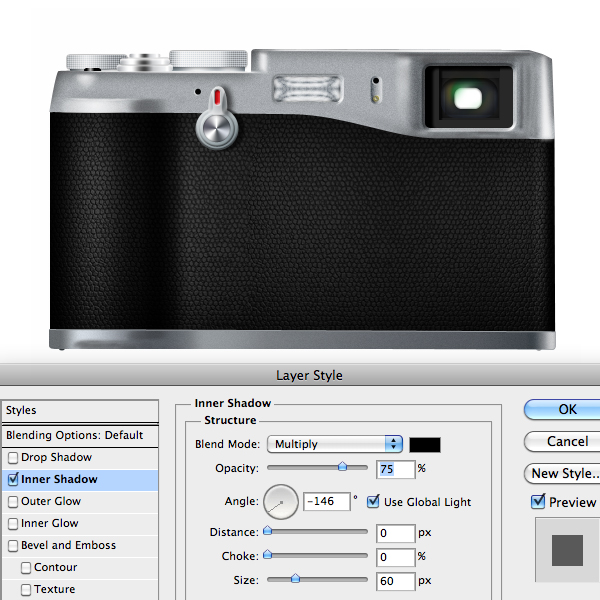
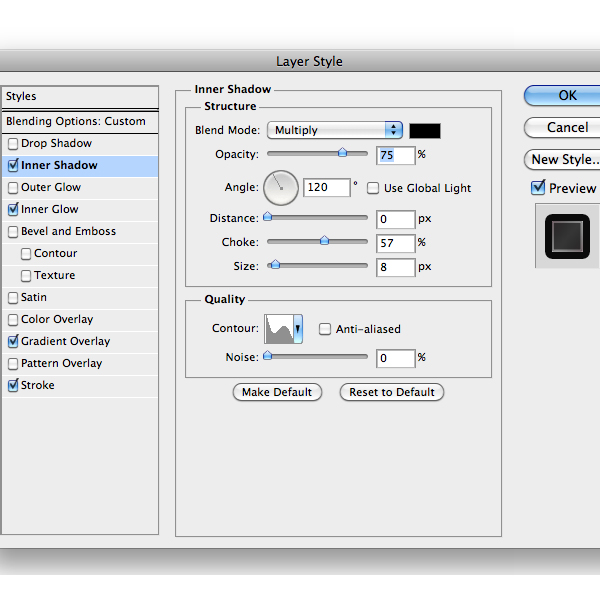
Now with the Rectangle Shape Tool draw a dark grey rectangle and add an Inner Shadow layer style with a low distance amount. Duplicate the rectangle and this time set a higher distance amount. Use the image below as a reference.

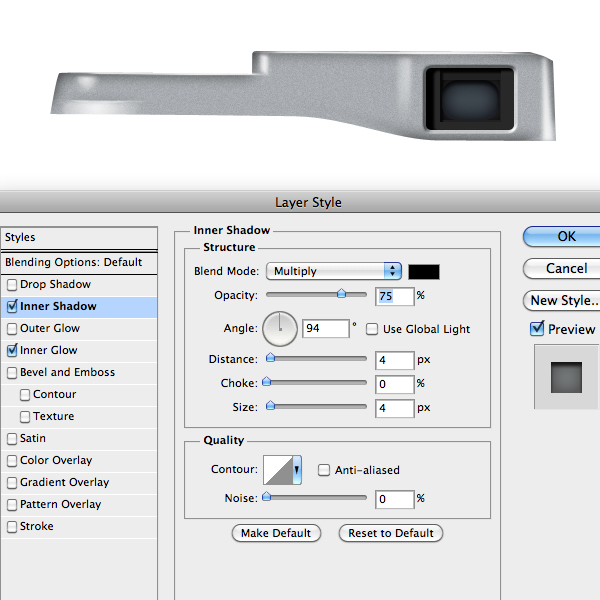
Step 9
With the Ellipse Shape Tool draw a dark blue shape and add the following style.
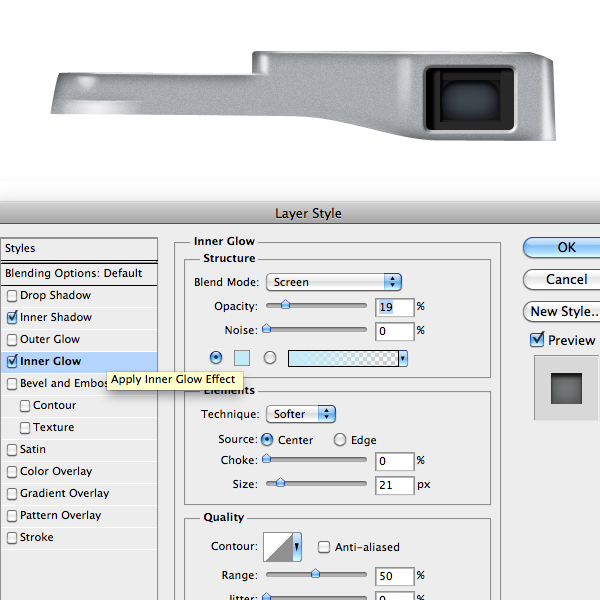
Step 10
Create another shape with the same tool but use the white color, then and add the following style.
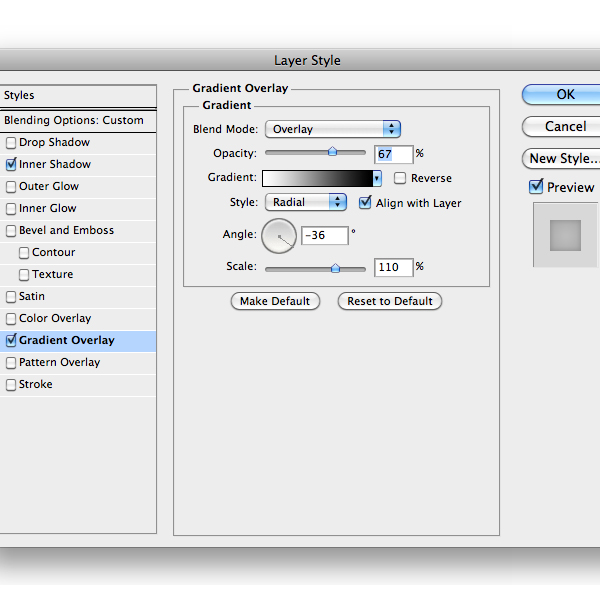
Step 11
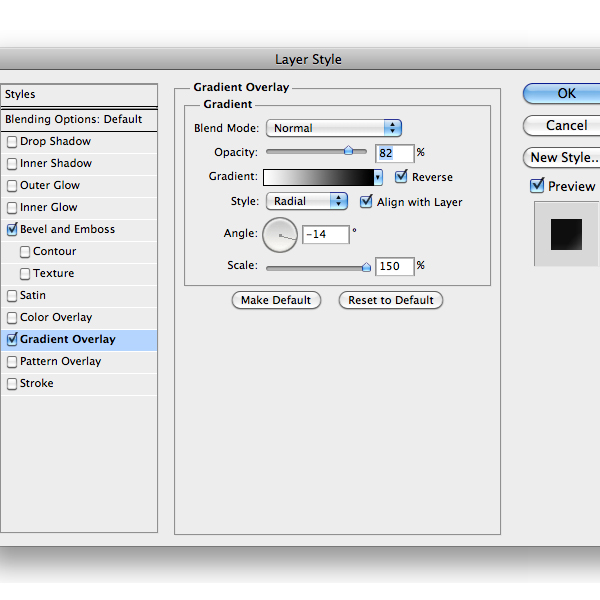
Add a Gradient Adjustment tool in the Radial mode with the following gradient setting to create the glass reflections. Use the Layer Mask to limit the reflection.

Step 12
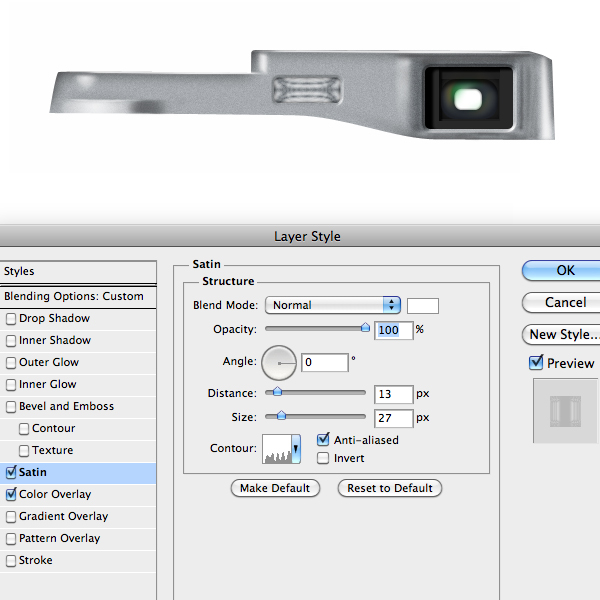
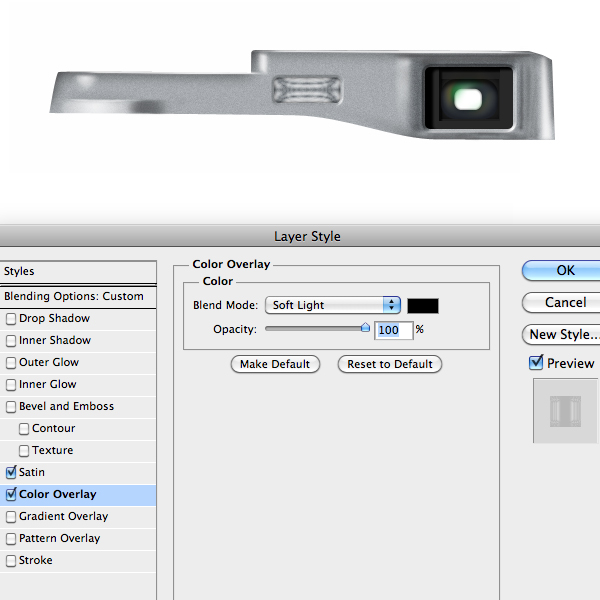
The next step is to draw a rectangle shape and add this style. Then decrease the shape fill opacity to 0%.
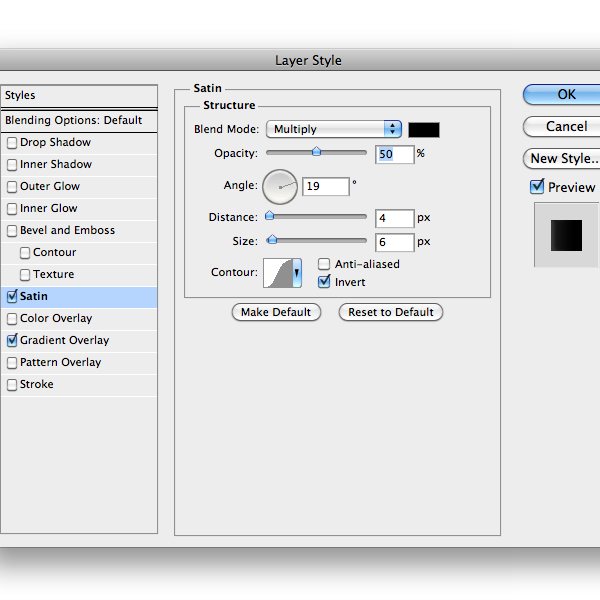
Step 13
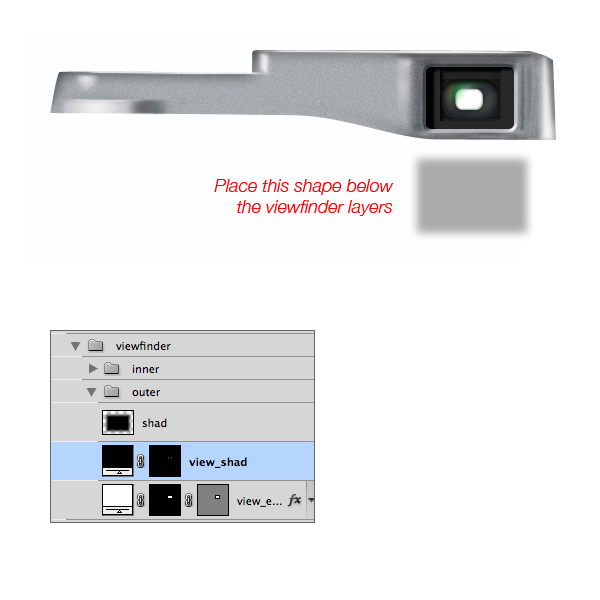
Use as usual a Color Adjustment Layer to create some shadow in the metal part as below. Then create a gray rectangle shape and add a Gaussian Blur Filter. Place the shape below the viewfinder and set the blending mode to Overlay and the opacity to 33%.
Step 14
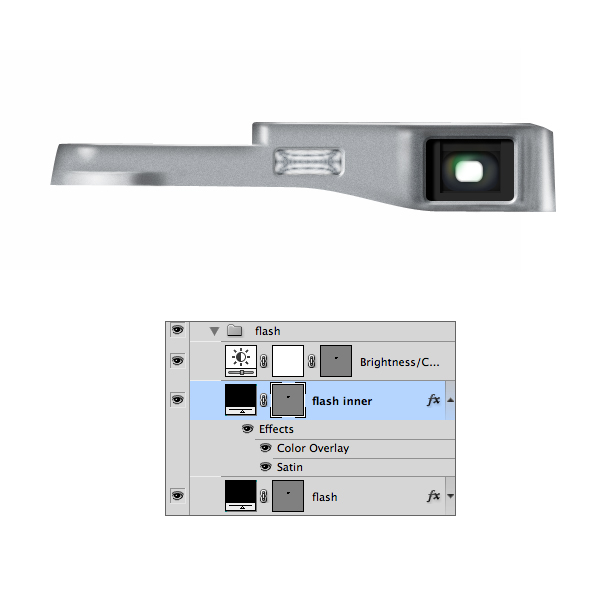
The viewfinder is done. Let’s start with the flash. Draw the correct shape and add this Layer Style.

Step 15
Repeat this step but this time use this Layer Style instead. If you want you can add a Brightness/Contrast Layers Adjustment to brighten up the flash as I do.
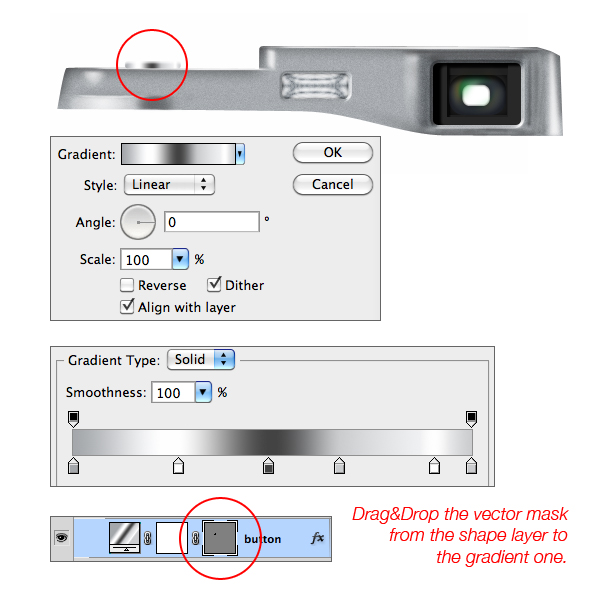
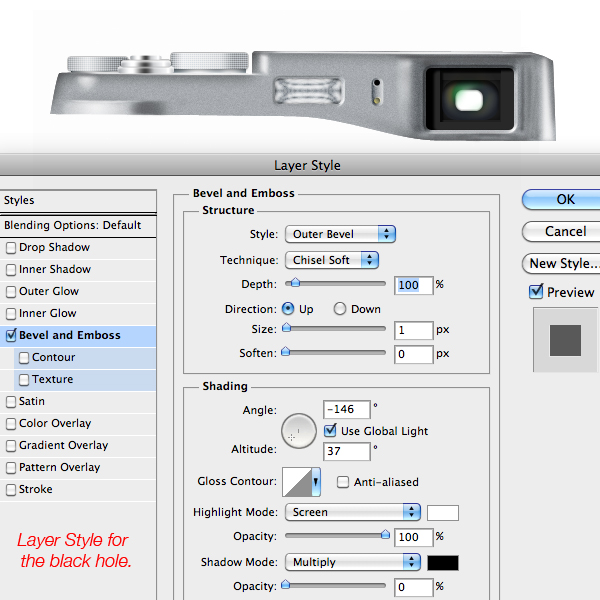
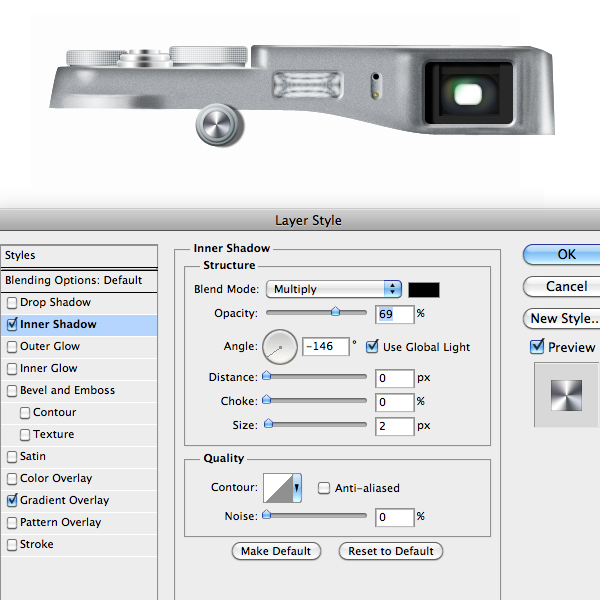
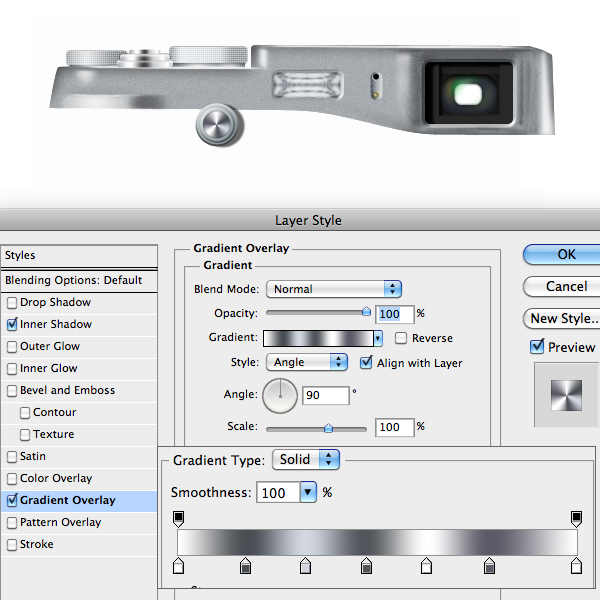
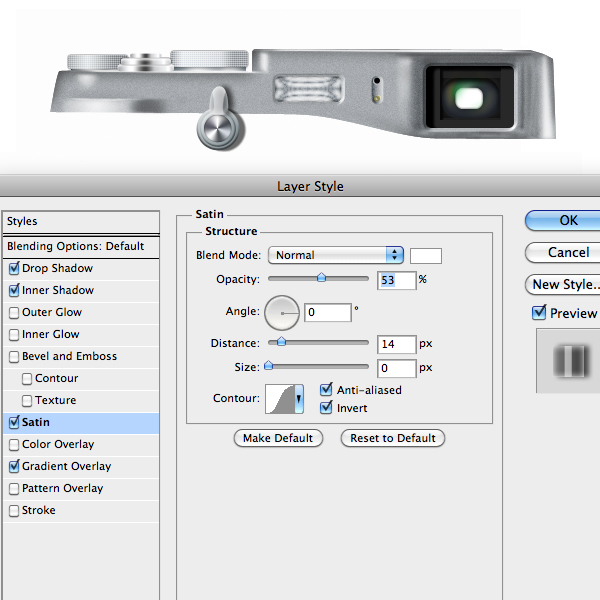
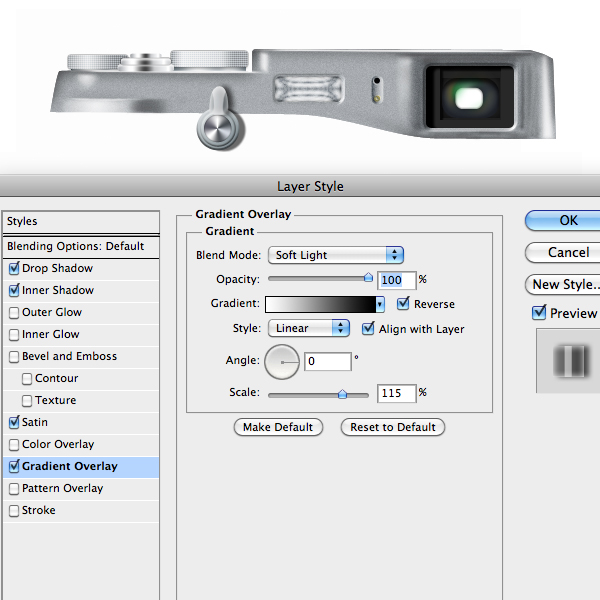
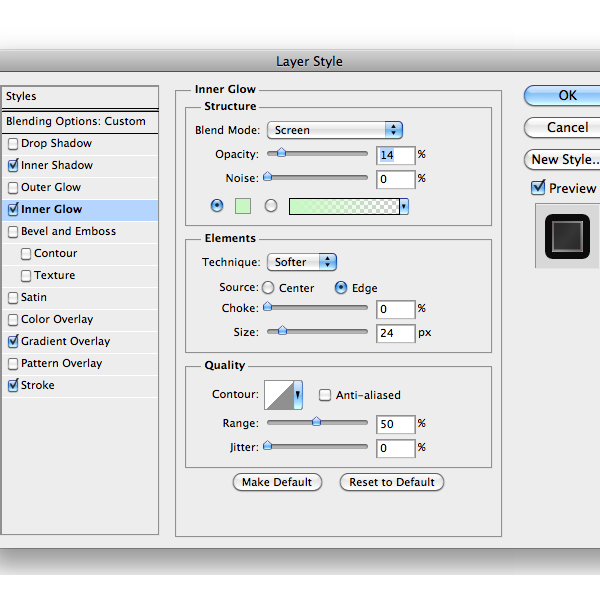
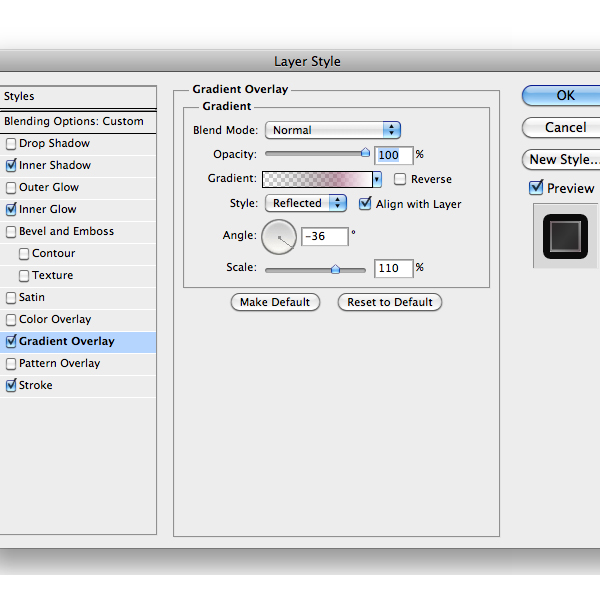
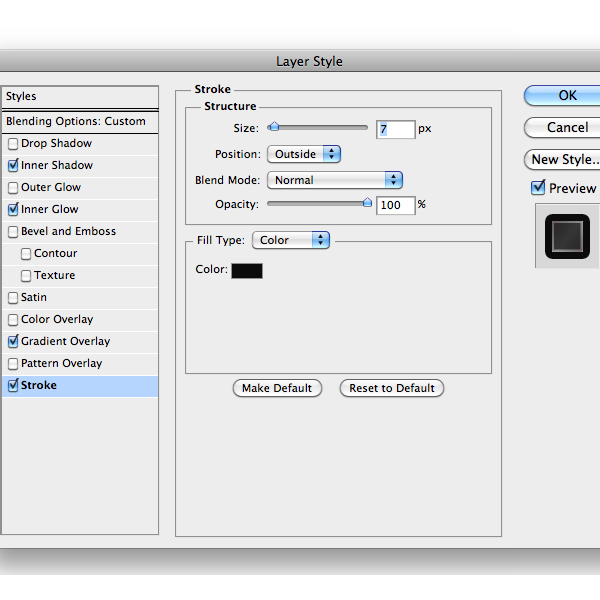
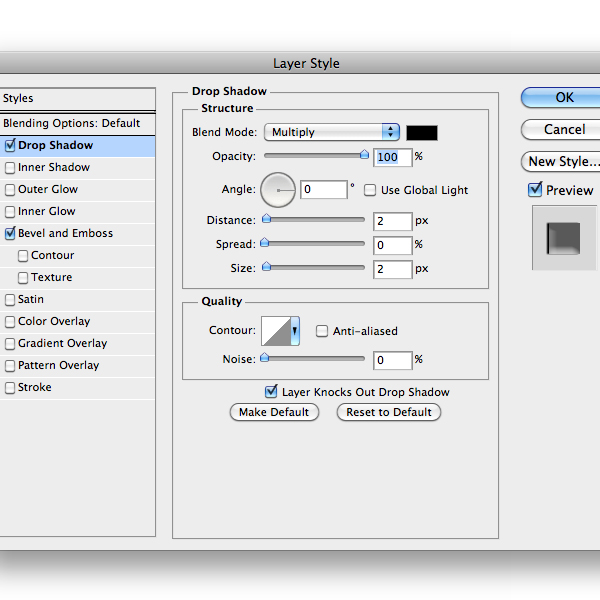
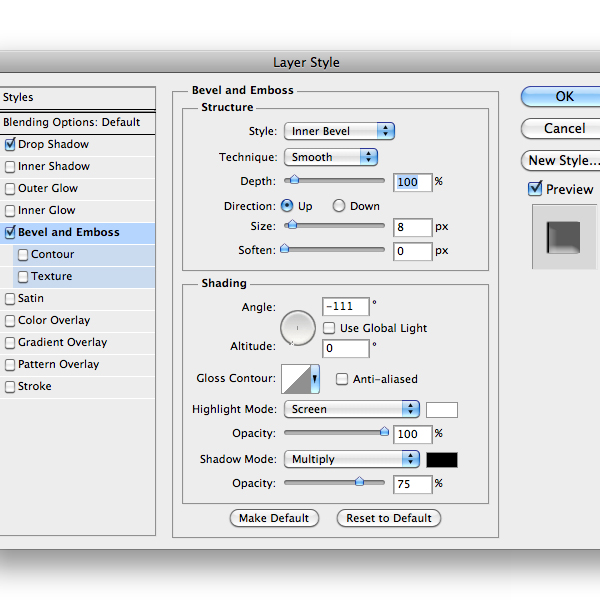
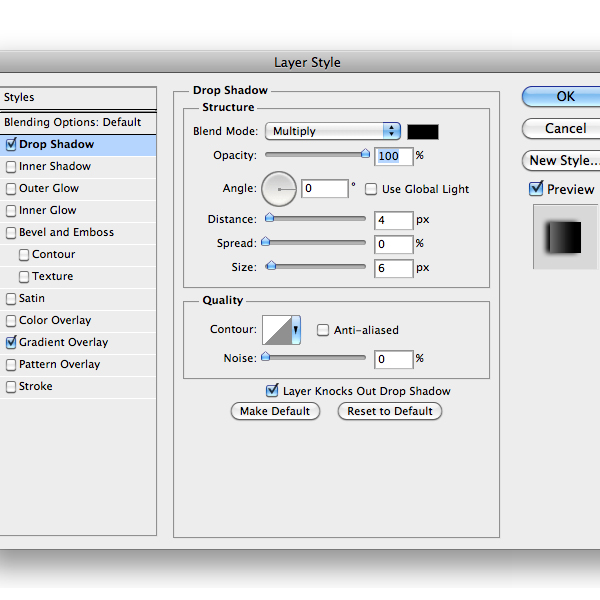
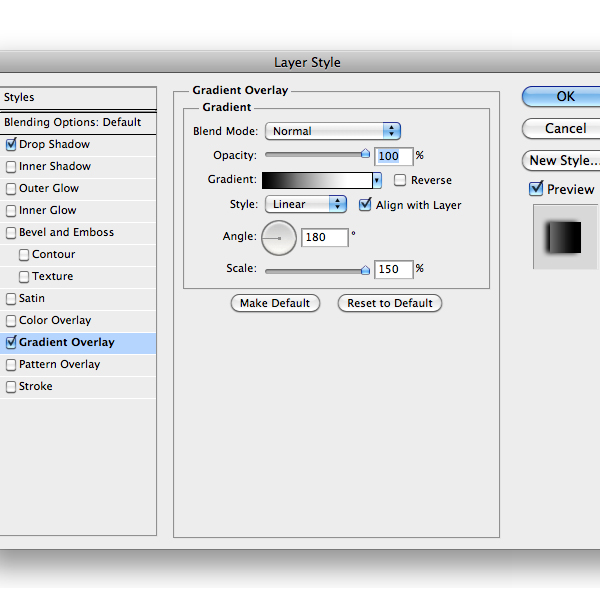
Step 16
For the shutter button create a thin shape as below with the Rounded Shape Tool (U). Next add a Gradient Adjustment Layer with this style. Now all you have to do is to drag and drop the vector layer mask from the previous shape layer to the gradient one. Simple and Easy. ![]() Finally add a little Inner Shadow Layer Style the gradient layer.
Finally add a little Inner Shadow Layer Style the gradient layer.
Step 17
Duplicate two times the previous layer. Then decrease their width by pressing Command/Ctrl + T. Arrange them as below.
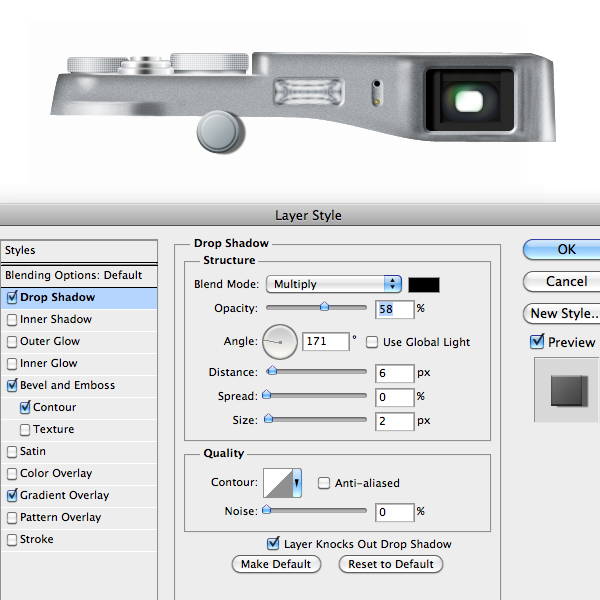
Step 18
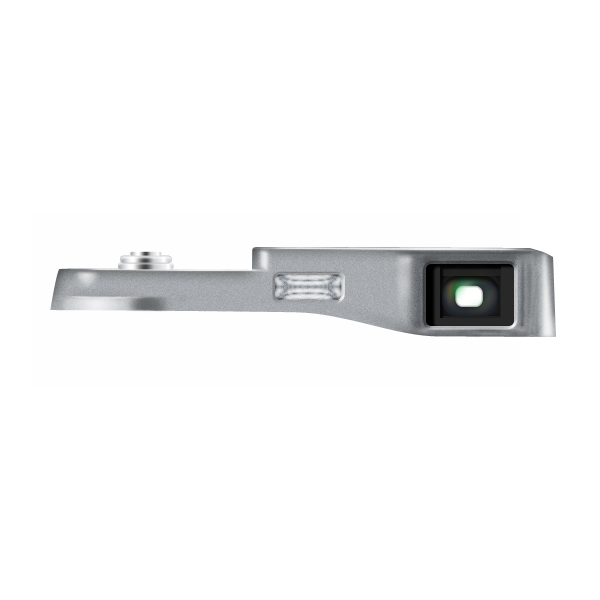
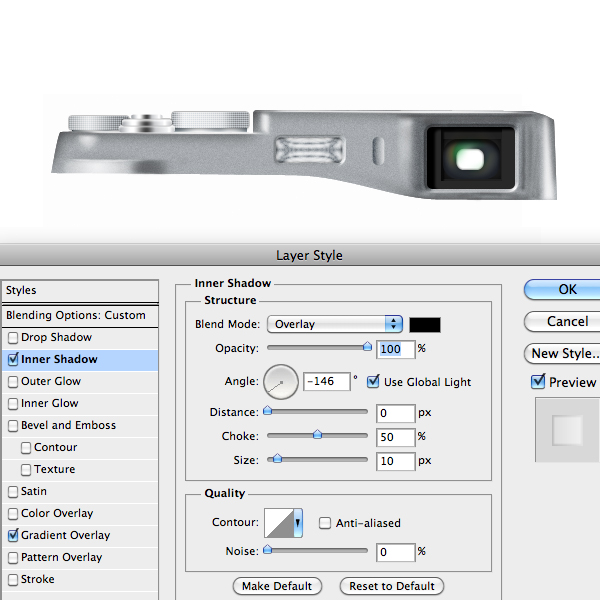
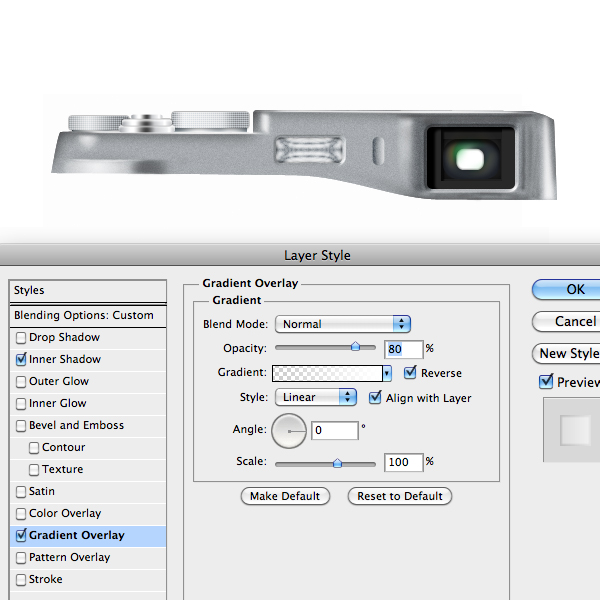
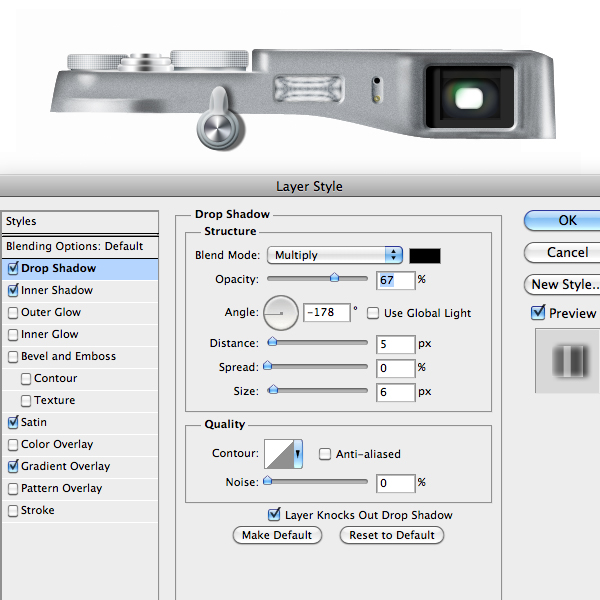
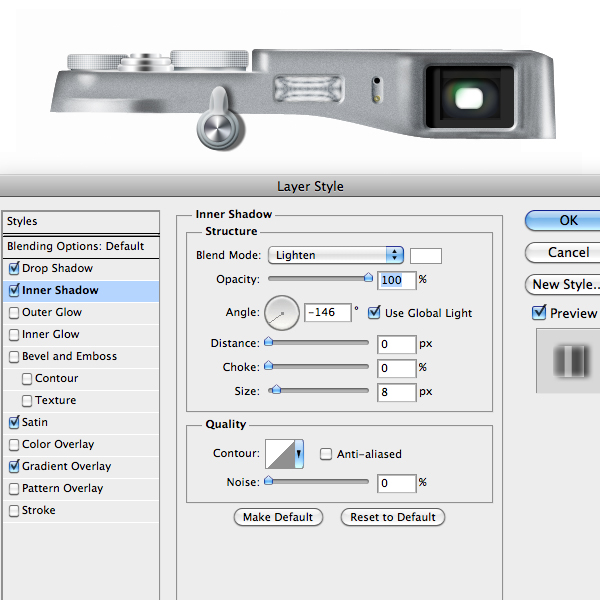
To create the handles draw a shape with the Rounded Rectangle Tool (U) and add this Layer Style.

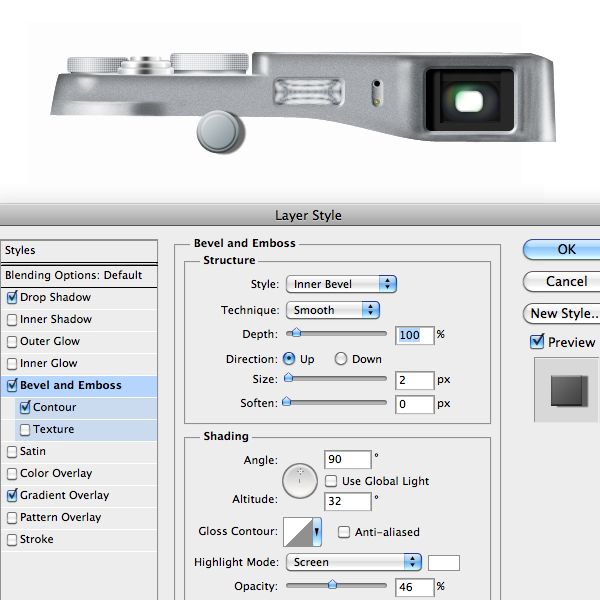
Step 19
With the Rectangle Shape Tool draw a little rectangle and put it below the previous shape. Next add this Layer Style. Duplicate the handle and place it as the image below.
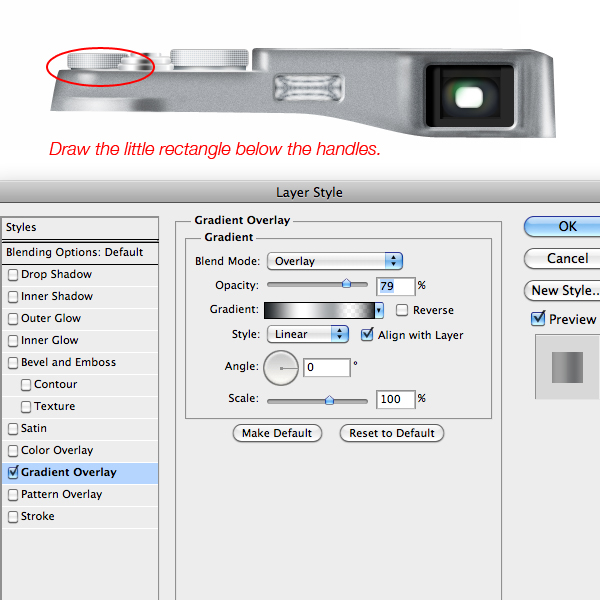
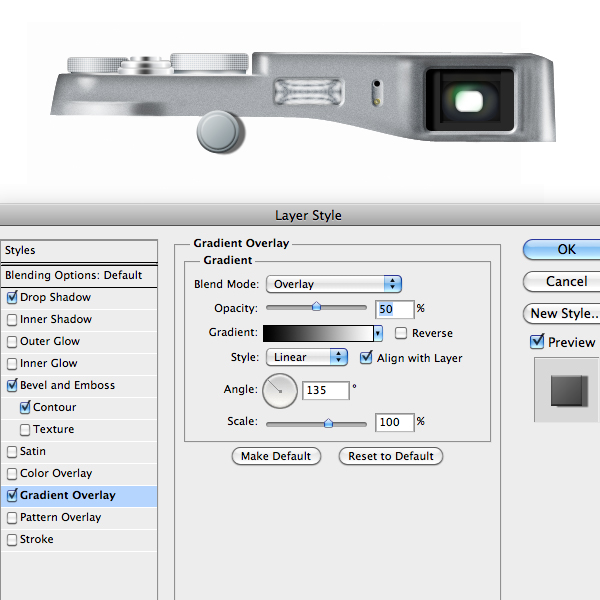
Step 20
Create a little shape between the flash and the viewfinder with the Rounded Rectangular Tool (U) and add this Layer Style.
Step 21
Draw two circles with the Ellipse Shape Tool (U), the first with a black color and the second with a dark yellow. Then add this Layer Styles.

Step 22
Draw another with the Ellipse Shape Tool (U), use a metallic color. Then add this Layer Style. Now duplicate the circle shape and decrease his dimension with Ctrl/Cmd + T. Use the Drop Shadow Style only for the first ellipse.
Step 23
Now draw the final circle an add this Layer Style to create the metal reflection.
Step 24
With the Pen Tool (P) draw a shape like below as usual use a metallic color. Now add the following Layer Style.
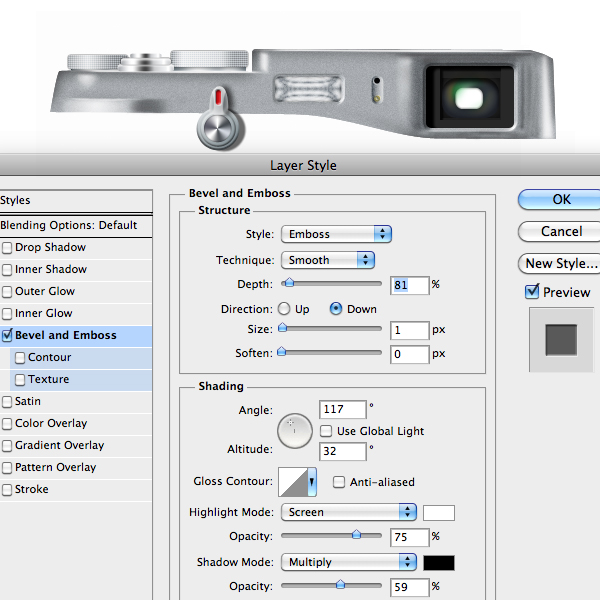
Step 25
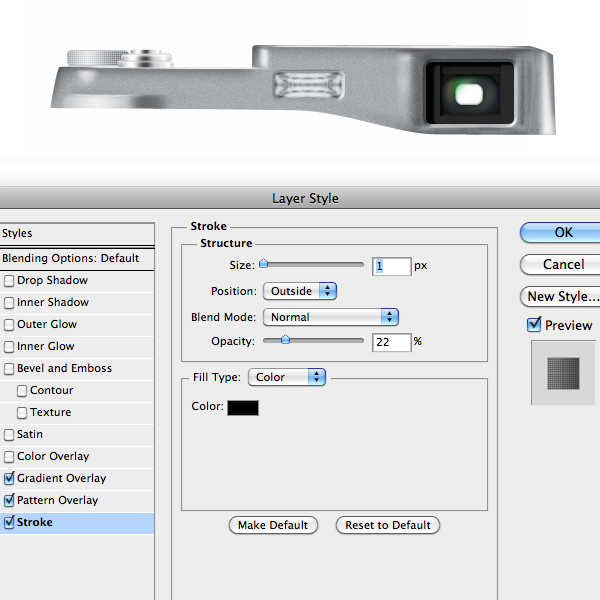
Use another Rounded Rectangular shape to achieve the little red mark. Apply this Layer Style.
Step 26
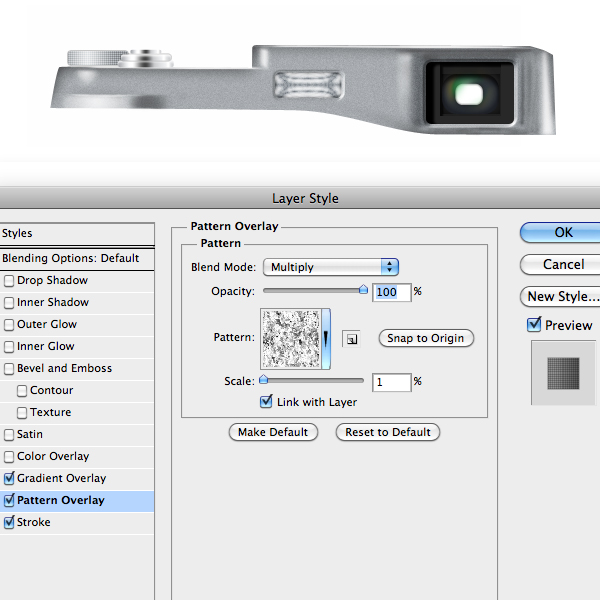
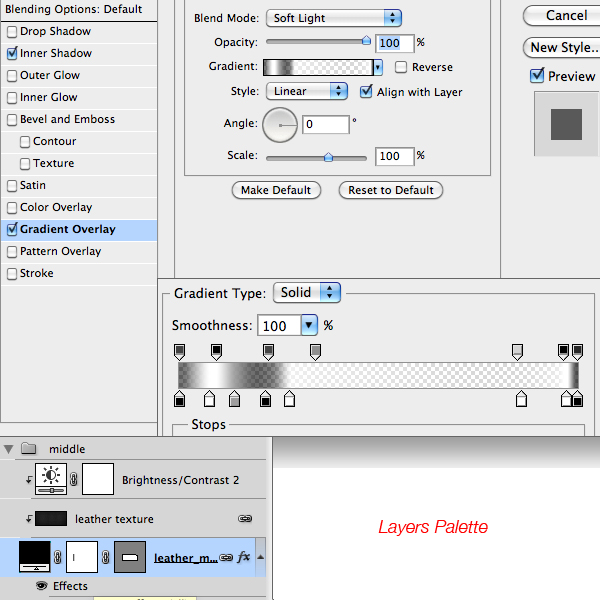
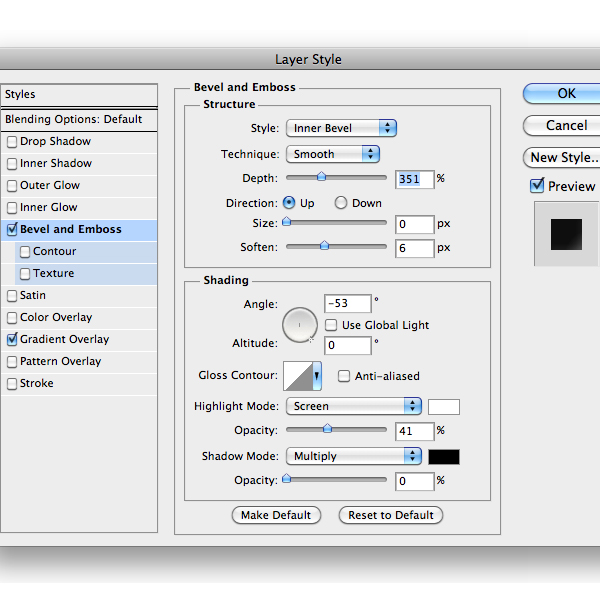
For the middle part draw the appropriate shape with the Pen Tool (P) with a dark gray color. The for the leather texture you can follow this useful tutorial, obviously on PsdTuts+ . As you probably notice I’ve add another hole, a small black button shape and two little dark shape on the bottom part.
Step 27
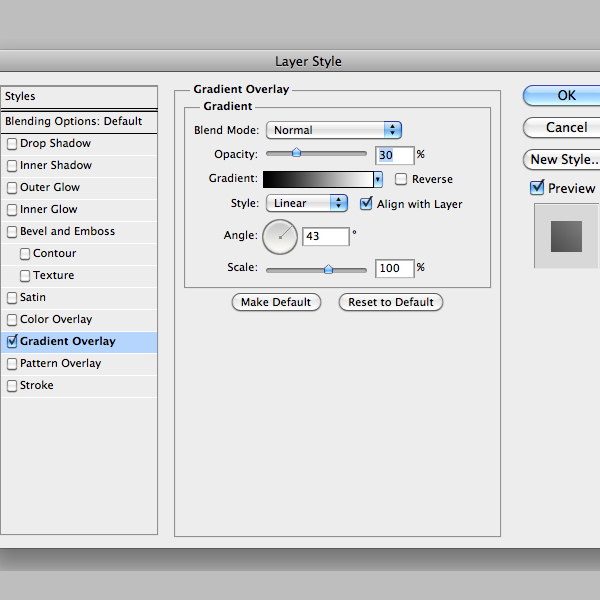
When the texture is done you can add an Adjustment Layer to change his brightness. Then add this Layer Style to the middle shape layer.
Step 28
Let’s do the lens now. First draw a circle with a metallic color and add this style.

Step 29
Draw another smaller circle and add this Layer Style instead. Then select the two circle layers in the Layer Palette and merge them into a Smart Object. Finally add some noise via Filter > Noise > Add Noise.


Step 30
Select a dark gray color and draw a circle as below. Add this Layer Style.
Step 31
Now we have to create other three circle. Here it is the Layer Style for the first one.
Step 32
The style for the second one.
Step 33
And finally the last one.
Step 34
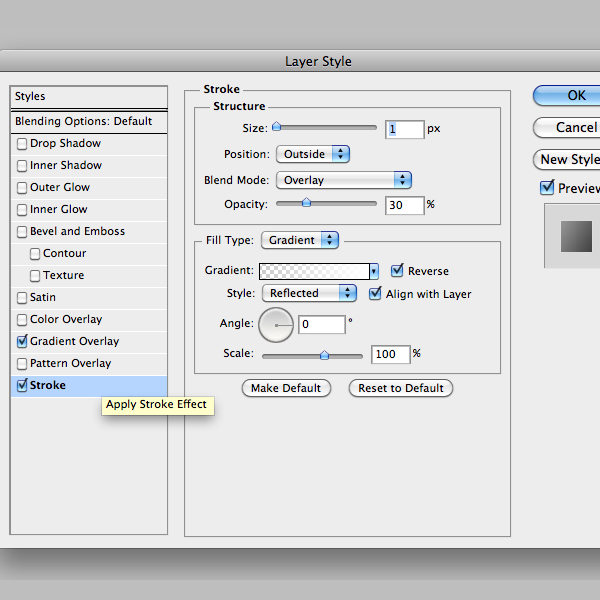
Create another circle and decrease the Fill Opacity to 0% in the Layer Palette. Add a thin Layer Style Stroke with a dark green color. Then duplicate and transform the circle as below.
Step 35
For the glass the procedure is the same. Add a circle with the following Layer Style.
Step 36
Add a second smaller circle inside the first one with this Layer Style.
Step 37
Draw a circle with the same size of the circle in Step 36 and use this Layer Style to add the reflection. Try to change the gradient position while the Layer Style window is open by simply clicking on it in the canvas.


Step 38
Add some text inside the lens. To achieve this curved style create a circular path with the Ellipse Tool (U) and then with the Text Tool click on the path and add the text.
Step 39
Draw a C black shape with the Pen Tool and add this Layer Style.
Step 40
Add a black rectangle shape below the C shape with this style.

Step 41
Finally draw another shape like below with this Layer Style.
Step 42
One final step is to add two little metal shapes with the Pen Tool (P).

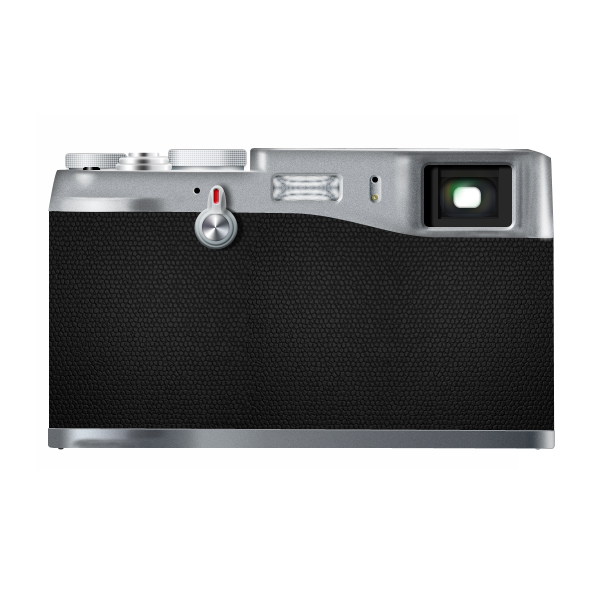
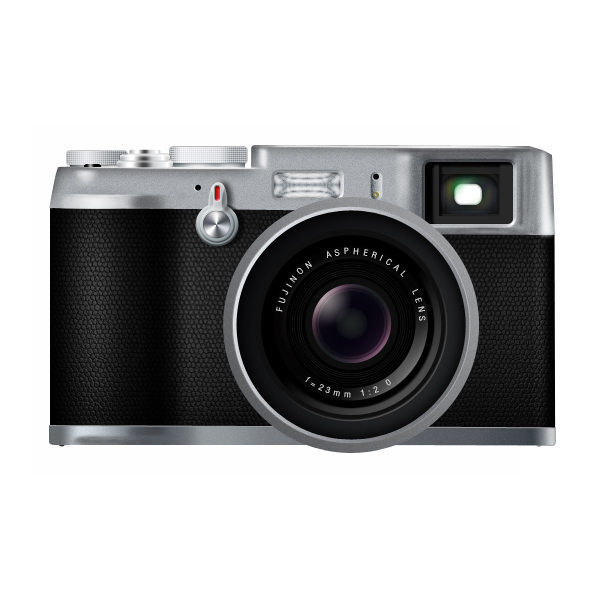
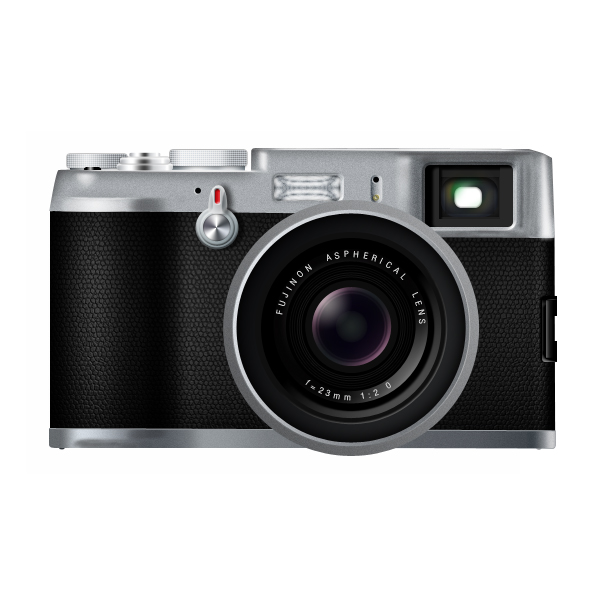
Conclusion
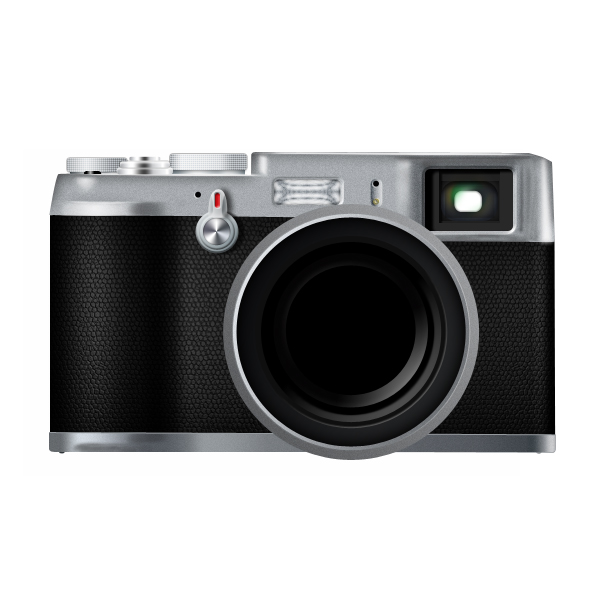
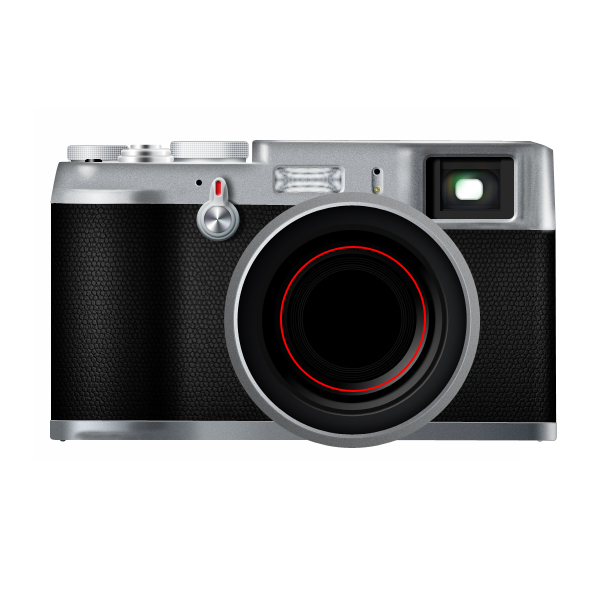
So the Fuji X100 is done! I’ve add a custom background. Of course you can customize the icon as you like. Final Tip: improve the sharpening with the Unsharp Mask Filter. Hope you like it!
|
| ||
|
+3386 |
3395 |
pllux |
|
+3357 |
3427 |
AlexsandR_MakhoV |
|
+3354 |
3417 |
Simple_Cat |
|
+3349 |
3432 |
Solnche605 |
|
+3344 |
3441 |
ДеВаЧкА-НеФоРмАлКа |
|
| ||
|
-1 |
661 |
Где отдохнуть?! Куда поехать?! Выбирай с нами! |
|
-1 |
565 |
ШНЯГА.ru - простые рецепты |
|
-1 |
36 |
doctor_livsy |
|
-2 |
605 |
aQir |
|
-2 |
6 |
SkaSkin |
Загрузка...
взяты из открытых общедоступных источников и являются собственностью их авторов.