| Сегодня 18 мая, суббота |
|
|
|
Какой рейтинг вас больше интересует?
|
Funky Mama ))) Fashion for Pregnant2011-08-26 11:21:07Phew! I finally got first sample photos for the long-delayed FunkyMama Project))) It’s a ... + развернуть текст сохранённая копия Тэги: funky, illustrate, inspiration, mama, photo, published, wacom Иллюстратор Алексей Ермолин (Alexey Yermolin). Акварель2011-08-12 18:09:16 + развернуть текст сохранённая копия
Тэги: alexey, art, design, fine, life, painter, painting, still, watercolor, yermolin, акварель, акварель,watercolor, алексей, графика,graphic,graphic, ермолин, женский, живопись, живопись,painting, живопись,traditional, изобразительный, иллюстратор,illustrator,иллюстрации,illustrations, искусство,art,арт, искусство,fine, натюрморт, натюрморт,still, образ, традиционный, художник, художник,painter, цветы Create a Lakeside Scene From Scratch in Photoshop – Psd Pemium Tutorial2011-08-04 20:00:58Photoshop is a great tool for creating realistic photo manipulations or compositions but it can also be used to create scenes completely from scratch. These types of exercises can be helpful to learn how to create textures and then apply them to your artwork. In this Psd Premium tutorial, author Stephen Petrany will demonstrate how to create realistic-looking wood and water textures, adding some nice nails to create a nearly true-to-life lakeside scene. This tutorial is available exclusively to Premium Members. If you are looking to take your design skills to the next level then Log in or Join Now to get started!
Professional and Detailed Instructions InsidePremium members can Log in and Download! Otherwise, Join Now! Below are some sample images from this tutorial.     Final Image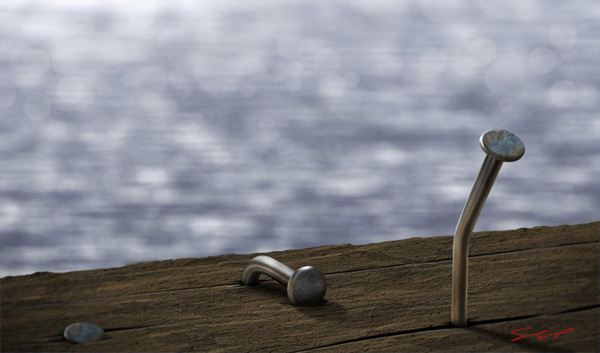 Psd Premium MembershipYou can join Psd Premium for as little as $9/month. Premium membership gives you access to the source files for all our tutorials as well as access to premium tutorials like this one. This also includes the rest of the sites in our network including Vectortuts+, Webdesigntuts+, Phototuts+, Nettuts, and more! Premium Members can Log In and download this tutorial. Otherwise you can Join Today!
Тэги: illustrate, premium Illustrator Tristan Elwell2011-07-16 23:25:07 + развернуть текст сохранённая копия
Тэги: art, canvas, cat, design, elwell, fine, illustrate, illustrator, oil, painting, tristan, арт, графика,graphic,graphic, живопись, живопись,painting, живопись,traditional, изобразительный, иллюстратор, иллюстратор,illustrator,иллюстрации,illustrations, иллюстрация, искусство, искусство,art,арт, искусство,fine, кот, традиционный, фэнтези, художник, художник,painter Create Custom Rims For Your Ride in Photoshop2011-07-11 21:00:34Advertise here Customizing your ride can be a lot of fun for those of you who are into that sort of thing. In today’s tutorial we will demonstrate how to create some custom rims for your ride and then show what they would look like if overlaid on top of an image of a car. Let’s get started!
This tutorial was prepared in collaboration with Radu Matei. Step 1 – IntroductionThe main tool that we will use is Pen tool (P) to create selections, as it is a much more versatile tool than the lasso tool. It can be tricky to use the first couple of times, but with practice it turns into a very handy tool. I use 0.3 feather when creating selections, and have the anti-aliased button checked, so no jagged edges appear. 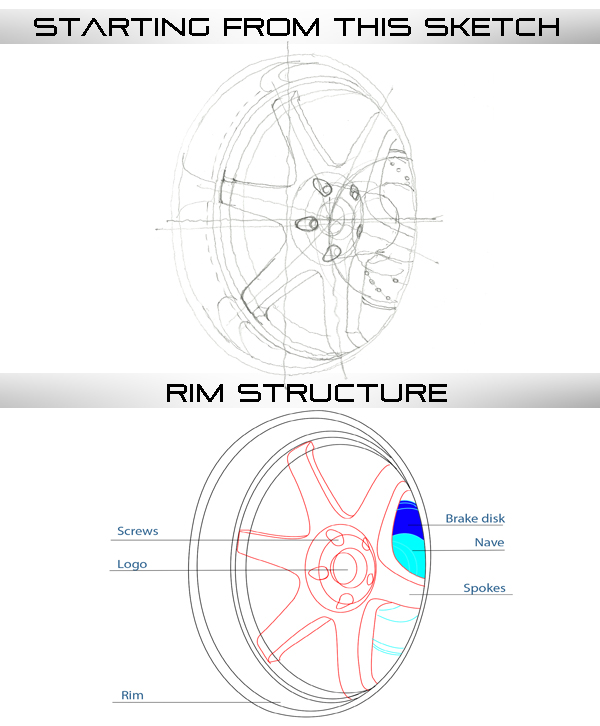 Step 2Start by loading up a sketch, and create a new blank layer (Command/Ctrl + Shift + N). Start tracing it with the Pen tool (P). For this, set the Brush tool (B) to 2px and black color. Select the Pen tool (P) and start tracing the lines. Don’t try doing too complicated shapes, just take your time and do it in small steps. After every line, right-click and select Stroke Path. Select from the cascade window Brush tool (B). 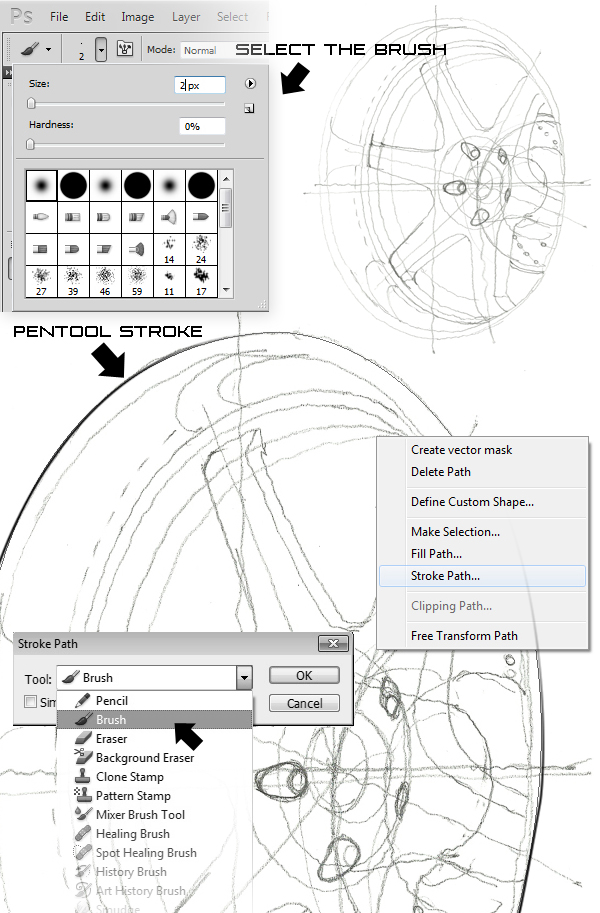 Step 3You should have something like this in the end (I’ve color-coded different parts of the wheel, so everything looks clearer).  Step 4Start by selecting the rim. Create a new layer and fill the selection with a dark grey (I’m going to make it dark steel, but if you want a stainless steel color, use a lighter grey). Move the sketch layer on top of this layer, so you can see the lines. Select the Brush tool (B), and set it to about 1000px, white color, with a fuzzy brush preset. Select the rim layer contents (Command/Ctrl + click on it’s thumbnail). Brush alongside the lower edge of the selection, like this. Following the images you should reach the same result. 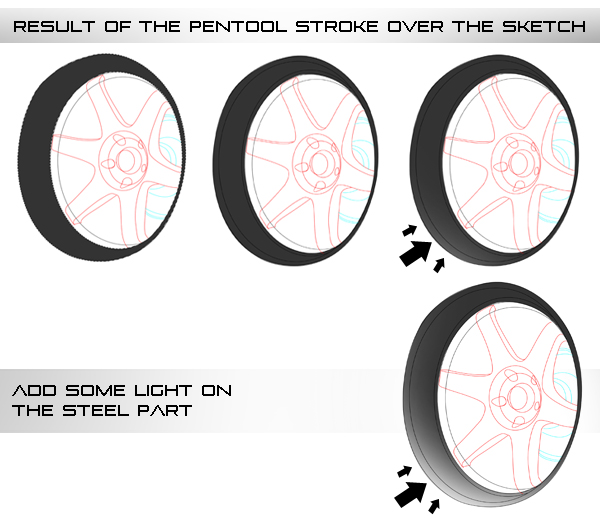 Step 5Trace the outer part of the rim with the Pen tool (P). Select the rim layer contents again and then, using the pen tool, right click and select Make Selection. Set the feather to 3 and Subtract selection. Use the same technique as previously to brush alongside the selection, only this time use black in the lower part and white in the upper one. You should get something like this. 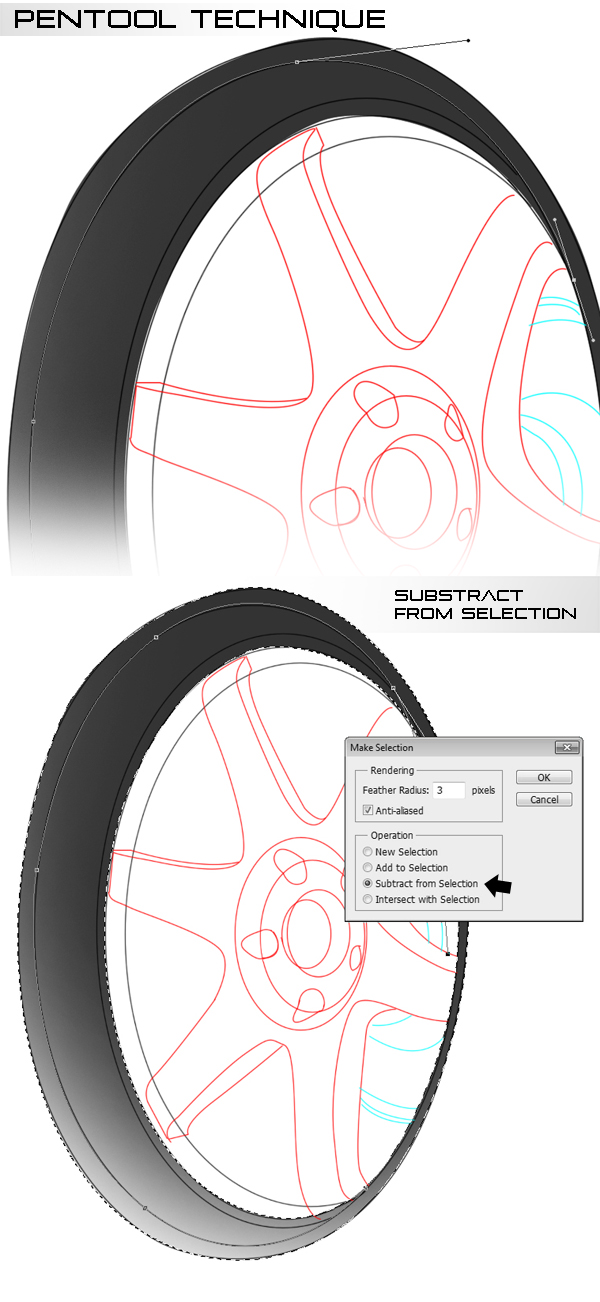 Step 6Trace the inner part of the rim now, select the rim layer again, and Make Selection, using a 2px feather and Intersect with Selection option. Gently brush with white on the top, and black on the bottom, alongside the selection. 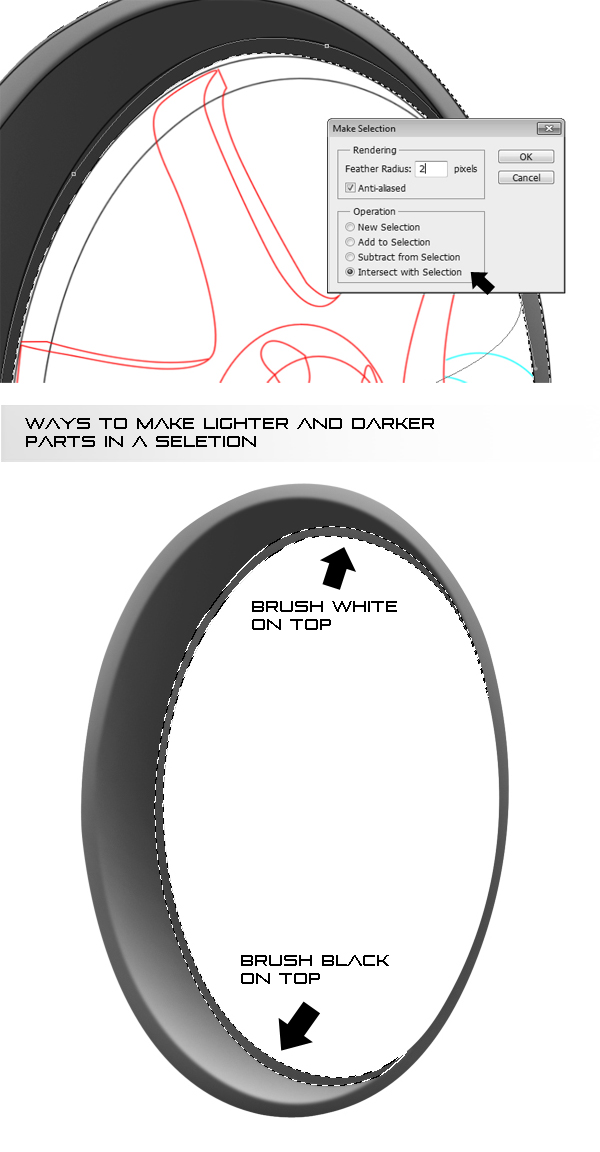 Step 7We’ll start adding some light reflections on the rim. Start by creating a New Layer, then select the Brush tool (B) and set it to white, 7px and select the fuzzy brush. Select the pen tool, and start tracing some curves. Right click, select Stroke Path, set it to Brush tool (B), only this time tick simulate pressure. Now there is a fading line instead of the path. Select the Eraser tool (E), Set it to 100px and about 25% opacity, with a fuzzy preset and start erasing some of the line, so that it fades even more slowly. You should end up with something like this. 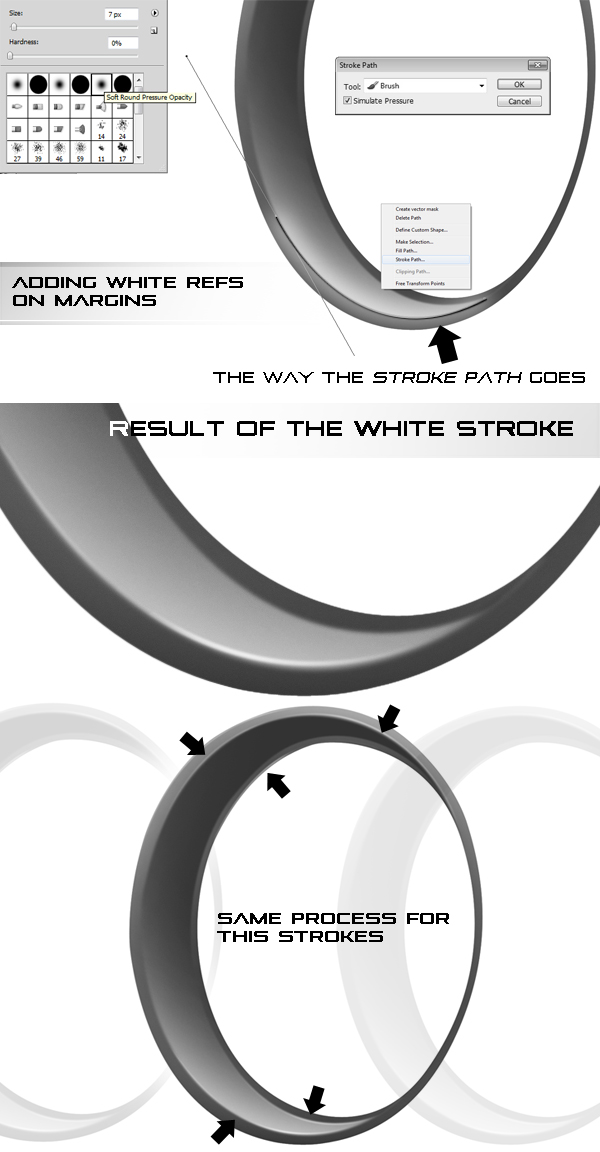 Step 8Start brushing the inner rim. Create a New Layer beneath the other rim layer, and repeat the shadow brushing technique – select the area, fill it up with dark grey, and brush with the big brush with black along the upper part, and with white along the lower one. Add light reflections on the lower part, in the reflections layer. After you’re done, you should have something like this. 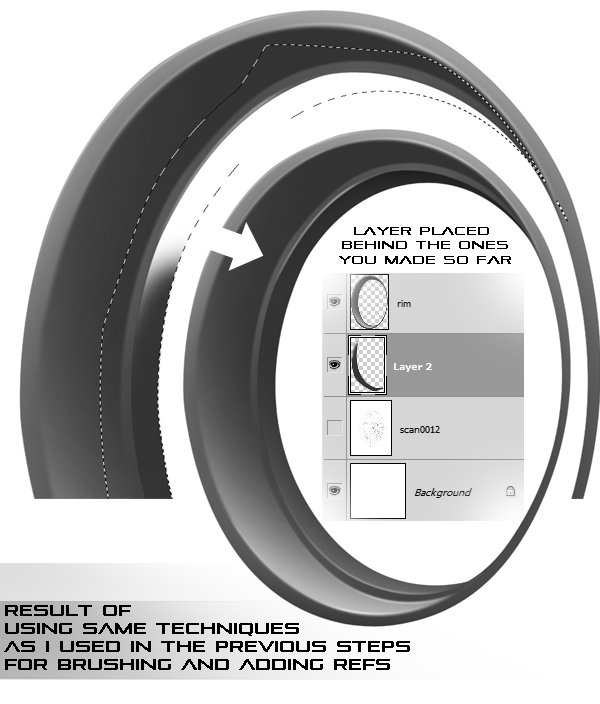 Step 9Merge the two rim layers together. Create a new layer on top of the rim layer. Select the brush tool (B), Set it to about 125 px, fith the fuzzy brush, and 100% opacity. Select black and white as primary and secondary colors in the palette, and start brushing some stripes over the entire rim. Use the X key to switch colors, and you should get something similar to the image below. Go to Filter-Blur-Motion Blur, and set the parameters to 0 degrees and 999 px. Select the middle part of the rim making a selection with Pen Tool (P), using a 3px feather, and then invert the selection (Command/Ctrl + I). In the stripes layer, press delete, so that everything except the middle part is erased. Set the stripes layer to Overlay mode, and set the opacity to about 60%. Repeat this step for the inner part of the rim, only use about 25% opacity. 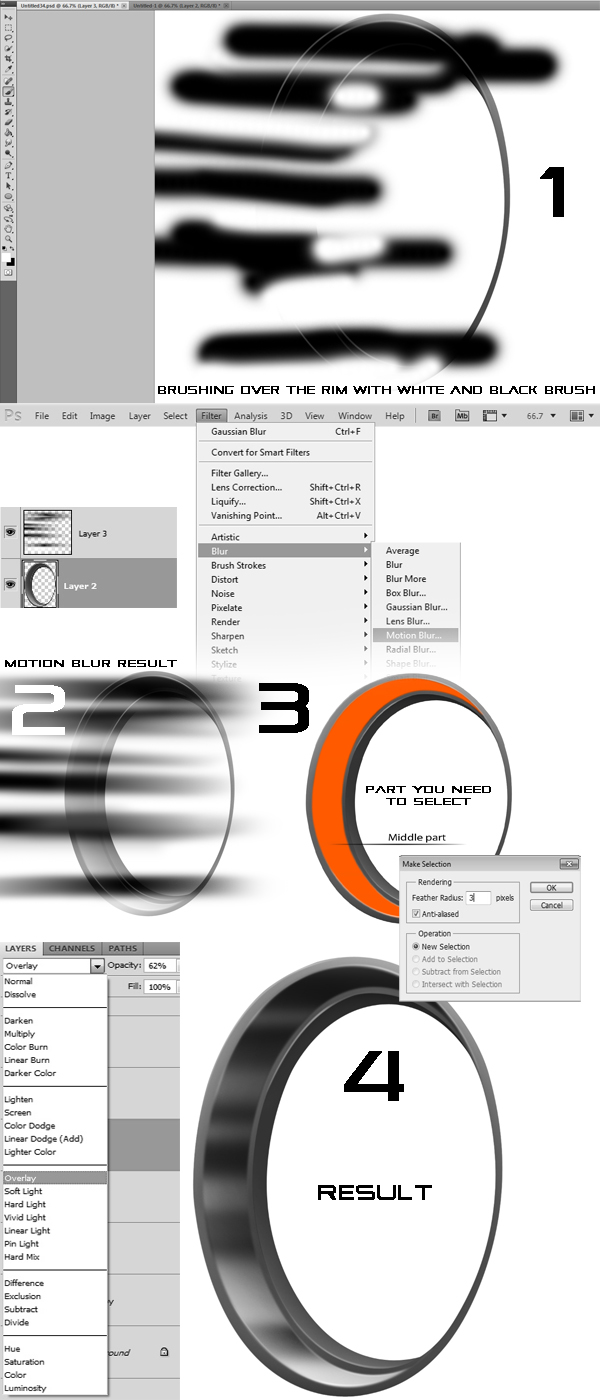 Step 10Merge the stripes layer with the rim one, and go to Image-Adjustments-Brightness and contrast (this step is optional). Lower the brightness with about 20 units, and raise the contrast by 40. 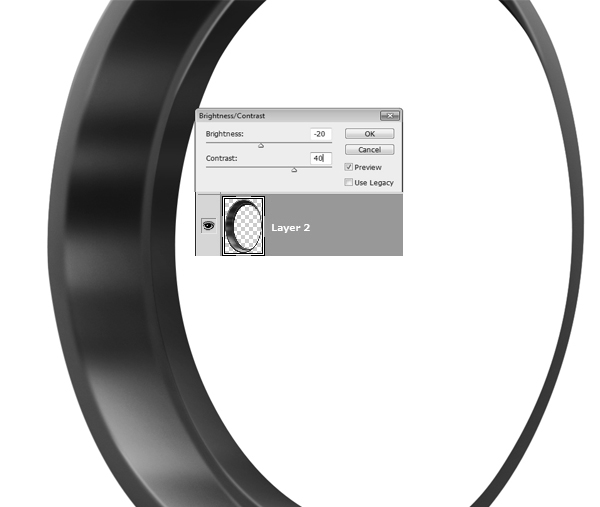 Step 11Create a new layer just below the sketch layer. Start tracing the spokes with the pen tool, and make selection, returning to the default value of 0.3 feather. For this tutorial I’ll be making some orange spokes, Japanese style tuning. The steps apply to any color, even white or black (with minor adjustments). Fill the selection with orange, in a new layer, on top of the rim and then you will have to add some light using white brush. 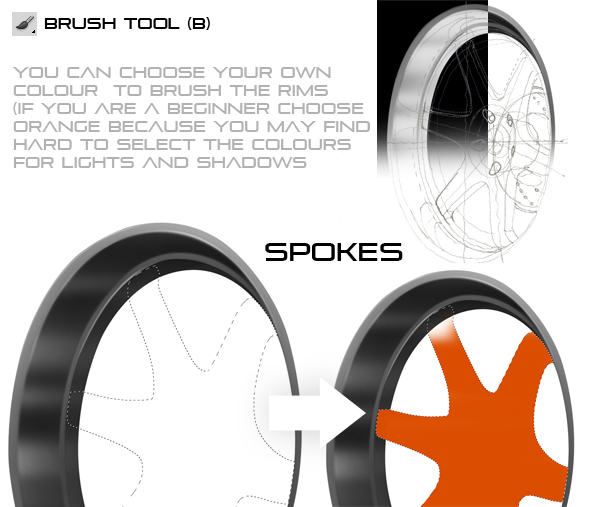 Select the inner part of the spoke, using 2px feather. Select the Burn tool, and use a big brush (about 225 px) and use it on the inside part. 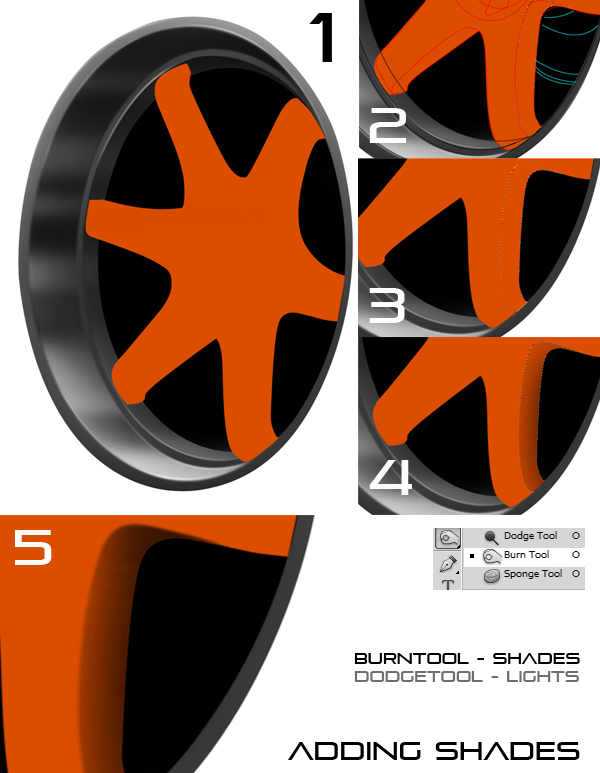 Step 12Create a new layer, on top to the spokes, and brush a small white dot or line, on top of the spoke. Use the Smudge Tool to smear it over the left half of the spoke. Set the layer’s style to Overlay 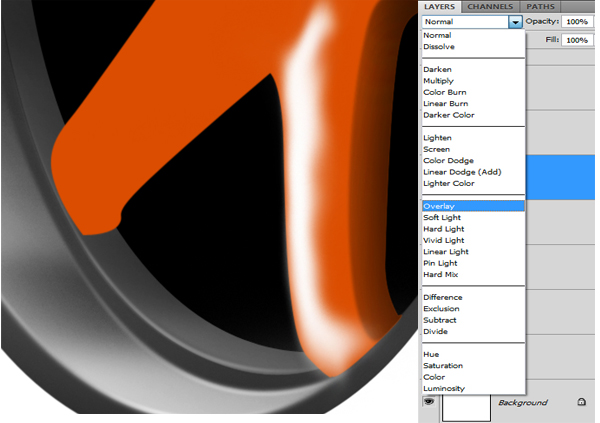 Step 13Start erasing some of the white, with a big eraser (200px) and low opacity (20-25%). This will make it look like it’s light shining on the spoke. Repeat this step again, but with a narrower strip of white 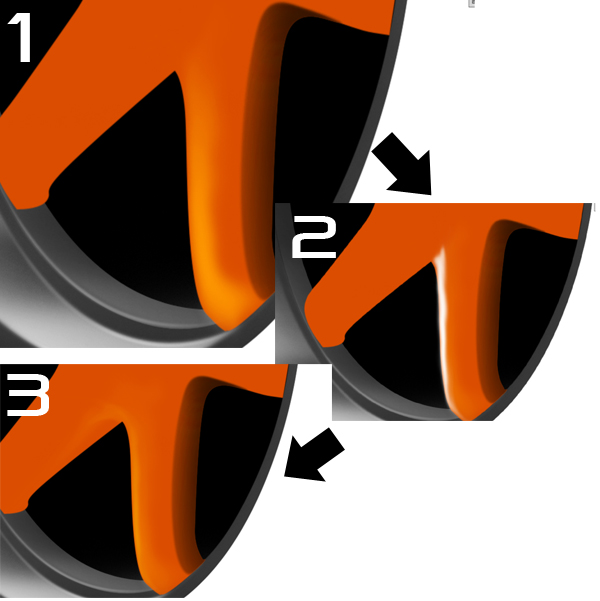 Step 14Start burning the lower part of the spoke, where it curves. Set the Burn tool (B) to Highlights, 125px, and to 10 to 15 strokes in that part. 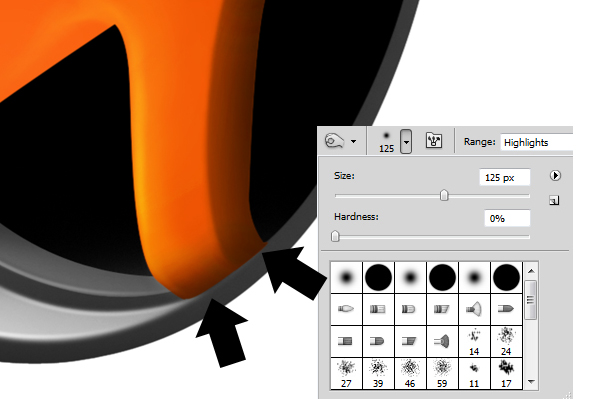 Step 15As we’ve done with the reflections on the rim, we’ll do with the spokes. Set the brush to 7 px, white color and 100% opacity. Create a new layer on top of the spokes. Trace the line on the right with the Pen tool (B), right-click and select Stroke path. Erase some of the line with the Eraser tool (E). This time, set the layer’s style to Overlay, and repeat this step with a second setting for the brush, with 15px width. 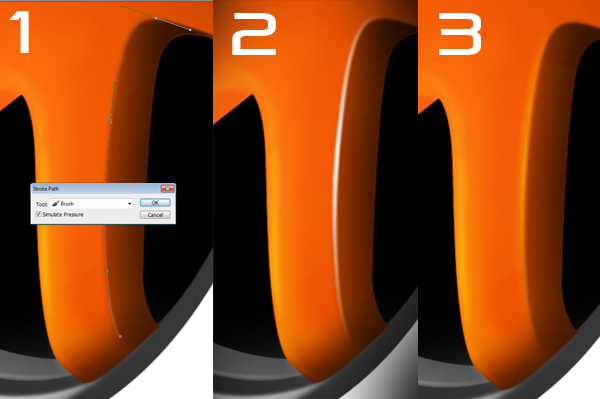 Step 16Repeat this step with each spoke, try getting something like this: Merge all the layers created for the spokes together. I’ve lowered the saturation a bit, to make the spokes less contrast. You can make adjustments at this step, using Image-Adjustments-Hue Saturation, to fine-tune the color or light. 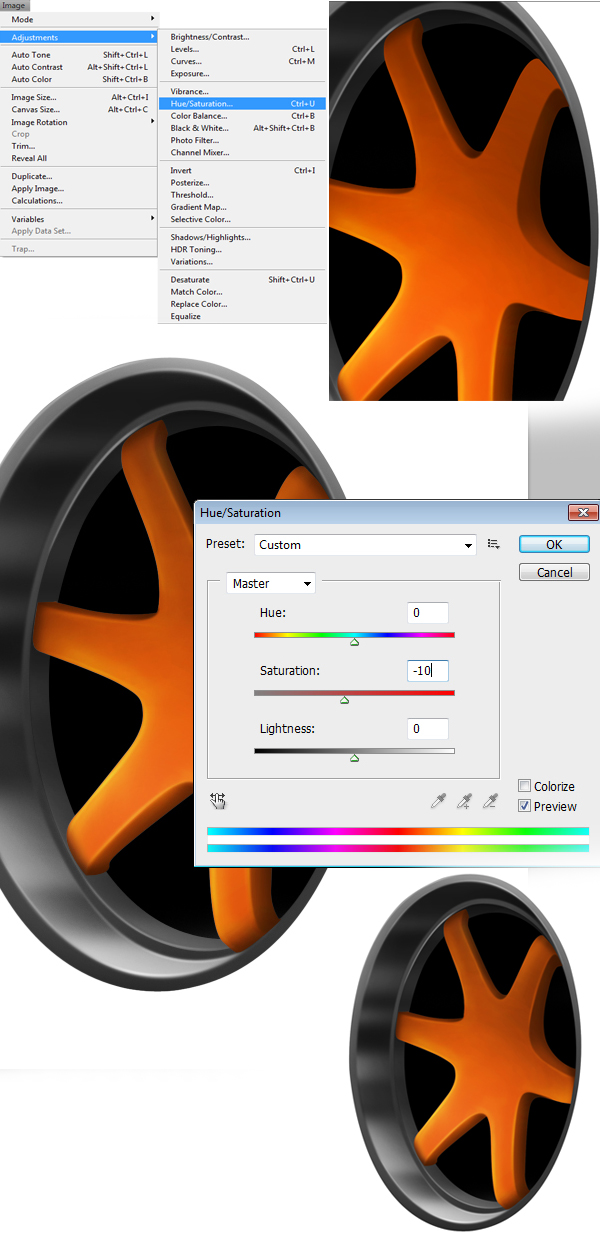 Step 17 – Lights (5)We’ll add some reflections of the spokes on the rim. To get a good picture of how they should look, try looking at some deep-dish rims, the reflections tend to follow the curvature of the rim. Make a selection like this, and fill it up with a darker orange (not too dark). Set the Smudge tool to 250 px, with a fuzzy brush, and smudge the lower part of the reflection, to make it look like it is fading away. Use the Burn tool to darken the reflection, making it a bit lighter colored to the tip of the rim. Set the layer’s opacity to 90%, and repeat this step for the other spokes., and on in the inner part of the rim. 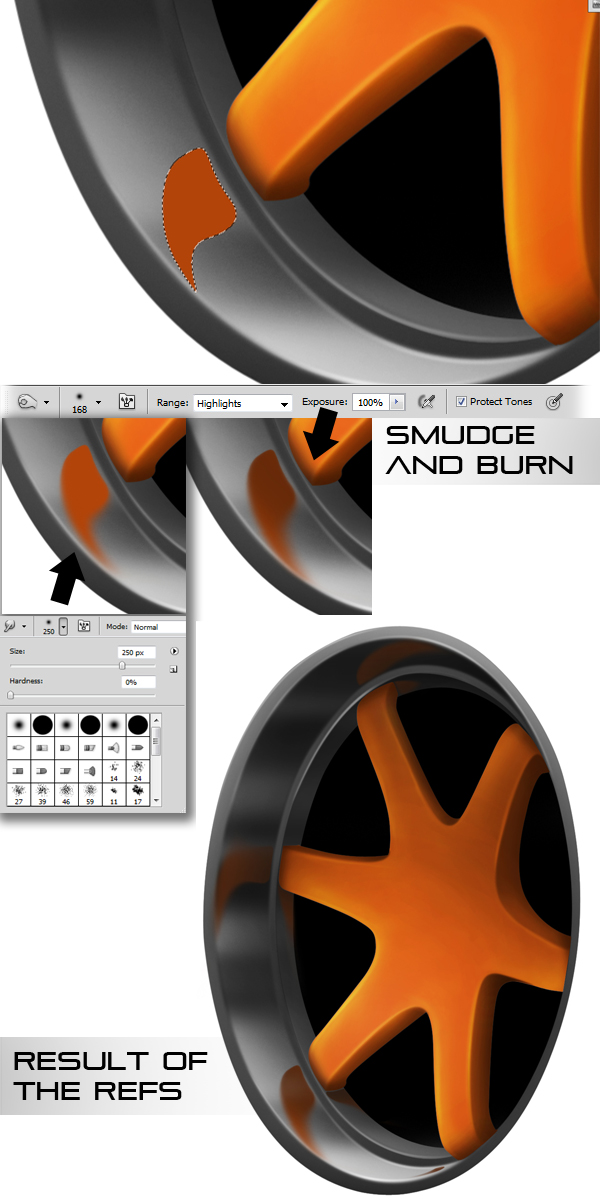 Step 18 – Lights (6)Select the middle part of the rim, as shown. Using the Elliptical Marquee Tool (L) to make the selection, right click and select Layer via Copy. We’ll save this part for later. Go back to the spokes layer, and select the center, but this time on the outer edge. Again, create a new layer via copy, now this layer should be under the previous center layer. Use Burn tool on the upper part, and the dodge tool in the lower part. 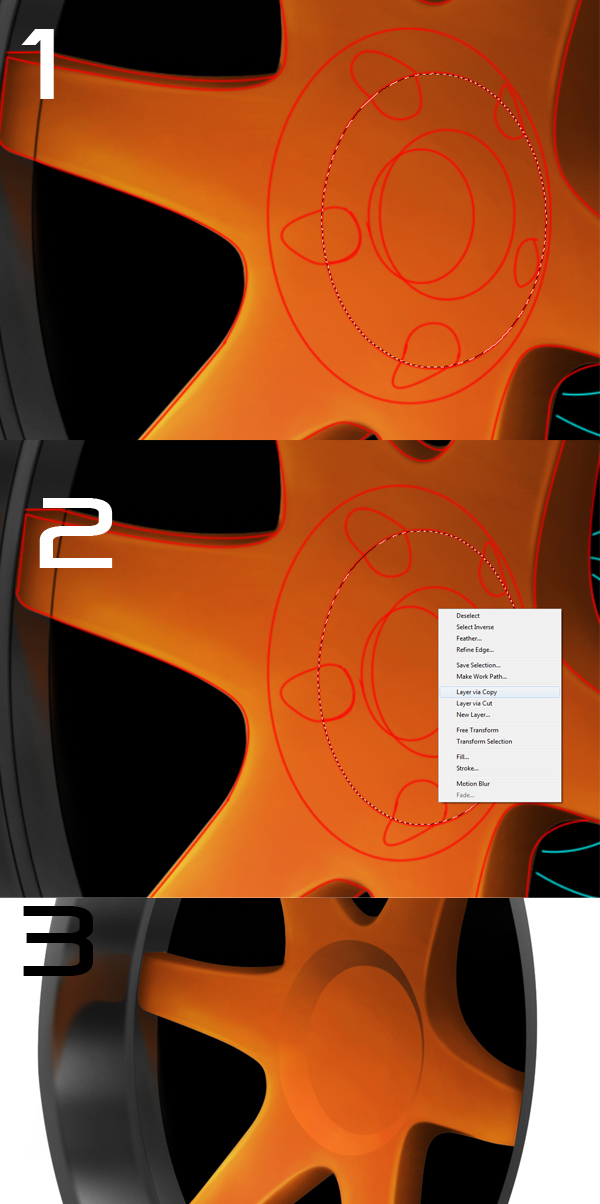 Step 19Create a new layer on top of this one, and create teardrop-shaped selection in the lower part of the layer, and fill it up with white. Set the layer’s style to Overlay, and start erasing some of it, using the Eraser tool (E), set at 20% opacity 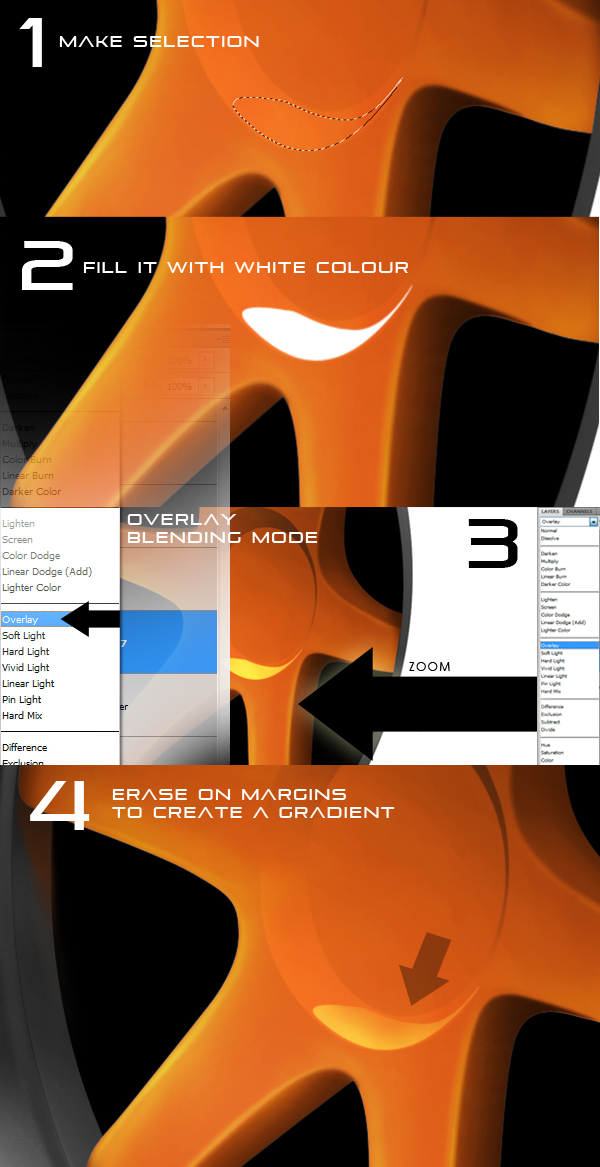 Step 20 – RefsUse the technique we used to create reflections on the rim to create round reflections around the center (use the brush tool at 7px, white color, and use the "Stroke path" option to create them). Merge all the spokes layers. 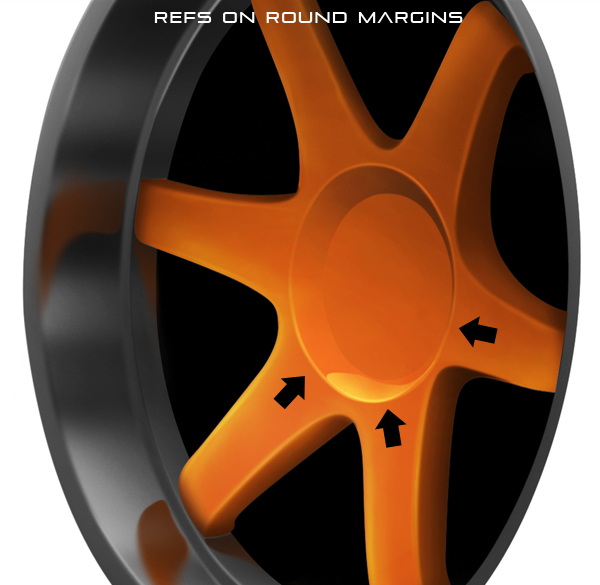 Step 21 – Creating the screwsCreate a new layer, in which we’ll make the screw itself. Use the ellipse tool to make a round ellipse. Turn the path into a selection, and fill it up with orange. Use the burn tool to darken some of it. Merge this layer with the one underneath (the screw location layer). Select the remaining area of the screw, and use the burn tool to darken it. Make some reflection on the contour now. Repeat this step for all screws. 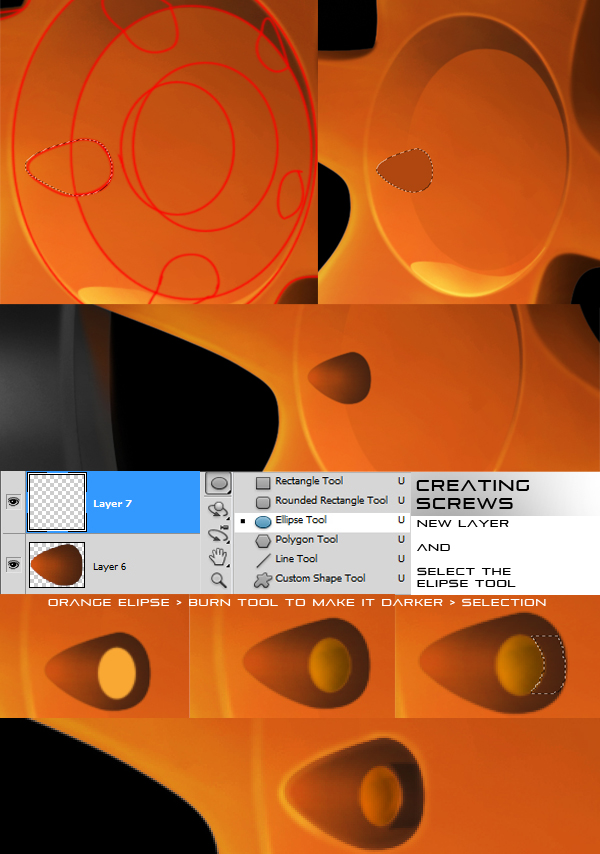 Step 22Select this part of the spokes, and create a new layer. Fill the selection up with orange, and start burning on the top and bottom part of the selection. 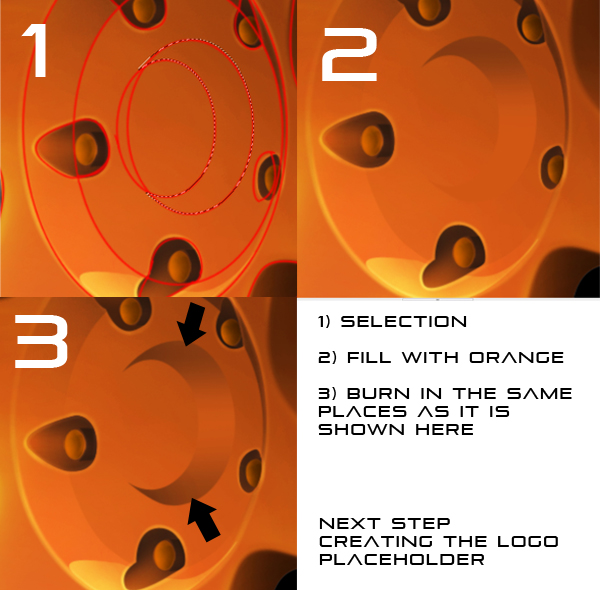 Step 23 – Logo PartTo make the logo, select it, create a new layer, and fill the selection up with black. Duplicate this layer, and press Command/Ctrl + I to invert the colors. Use the Free Transform option (Command/Ctrl + T), keeping the SHIFT key pressed to scale down this layer. Drag the white part to the right, till it looks like it’s sunken in the black part, and then press Command/Ctrl + I again to make it black. Select the layer now, by pressing Command/Ctrl and clicking on the layer’s thumbnail, and set the Brush tool (B) to 250px, white color and 100% opacity. Brush round the selection, so that the center remains darker. Make a wavy selection through the middle part, as shown, and brush more with white. Load up the other black layer, and brush with white a bit, on the lower half. 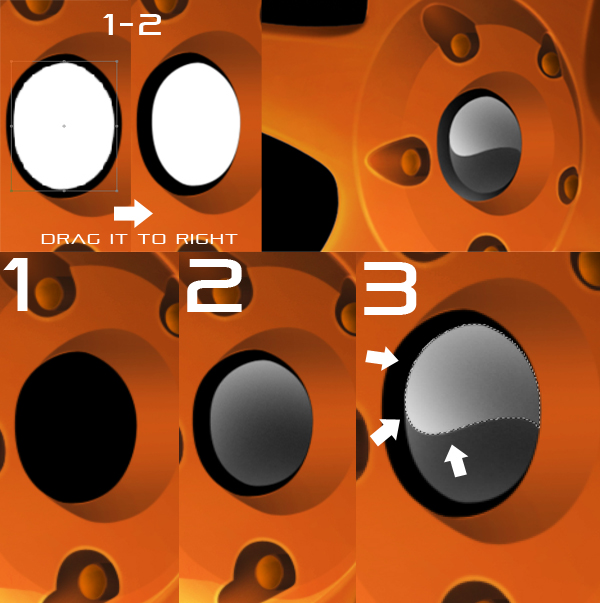 Step 24Create a new layer on top of the black ones. Select the first black layer, and go to Edit-Stroke and set a 3px value, and Outside option. Erase most of the white circle, till it looks like this. Repeat this step with the other black layer, only set the white ring layer to Overlay. 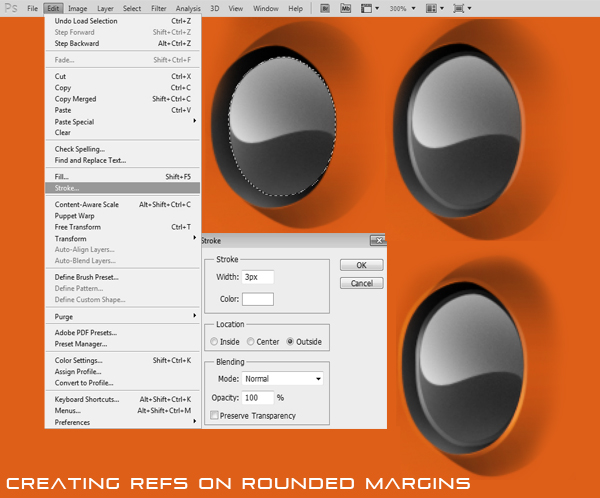 Step 25We’re done with the spokes, it’s time for the nave now. Merge all the spokes layers, and create a new layer underneath the merged spokes. Select the first section of the nave. Don’t worry about overlapping with the spokes, this layer is underneath and won’t overlap. Fill the selection up with a dark gray. Use the burn tool to darken the top and bottom parts. Create a new layer underneath the first section of the nave. Select the second section, keeping an eye out not to overlap with the rim. Fill this up with a slightly lighter gray than previously used. Again, use the burn tool to darken the top and lower parts. 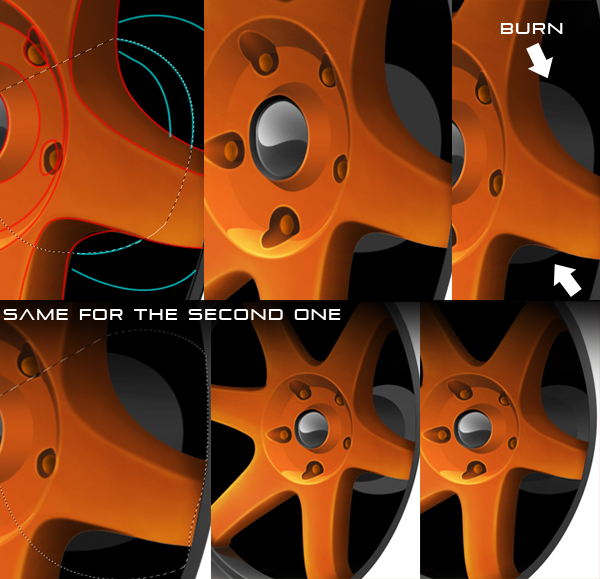 Step 26We’ll start working now on the brake disk. Create a new layer underneath the nave, and select the brake disk shape. Fill the selection up with a slightly yellow-ish color (I’m using 483a23). Use the burn tool to darken some of the color, on the left side. 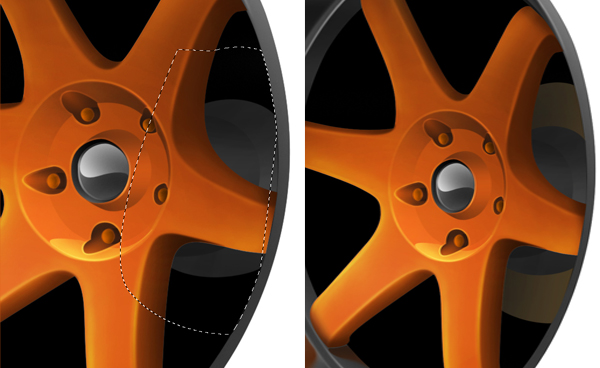 Step 27Use the Ellipse tool to create the holes in the brake disk, make a selection from the path. Use the Dodge tool on the lower part, and the burn tool in the upper part, to give the impression of a dent. Using the Lasso Tool (L) , right click on the selection, and select Layer via Copy. We’ll use this layer to copy the holes in other places. Create a round path, so you can place the holes the right way. (They’re placed in spirals round the disk). Copy and place on the path 5-8 holes, depeding on their size, like this (To copy a layer, right click on it’s thumbnail and select Duplicate layer). 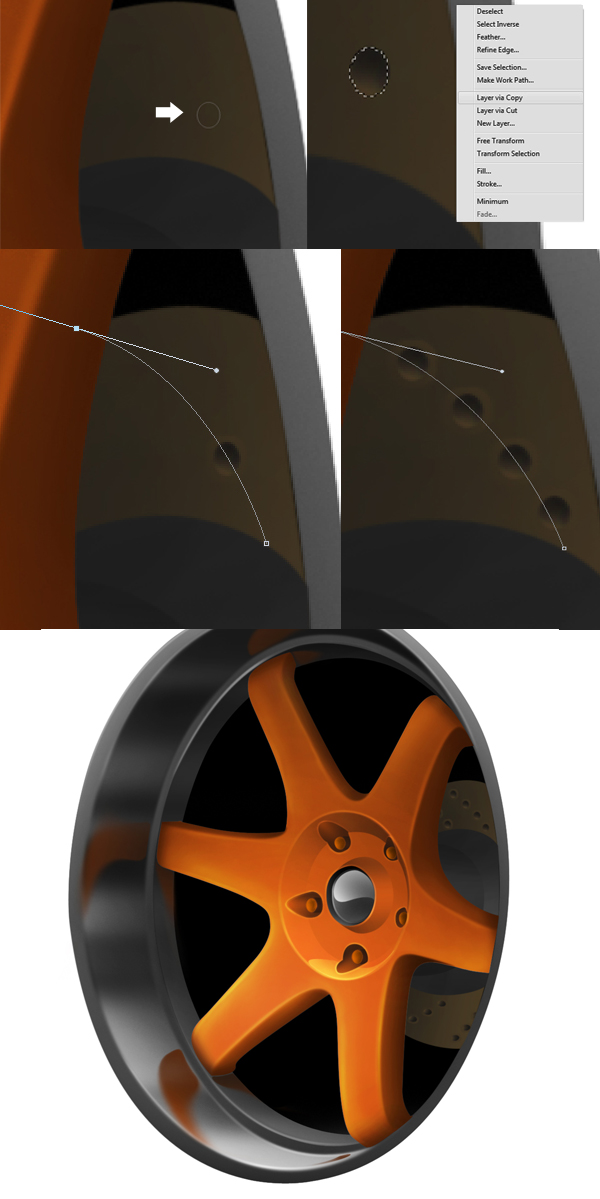 Step 28Merge the nave layers with the brake disk and the holes. Create a path of this shape, to mimic the shadow of the spokes. Create a selection, using 20px feather. Fill this selection up with black. Be careful to erase the part that overlaps with the rim, using the normal 0.3 px feather on the selection. Set the shadow layer’s opacity to 65%, and do this again in the lower part. 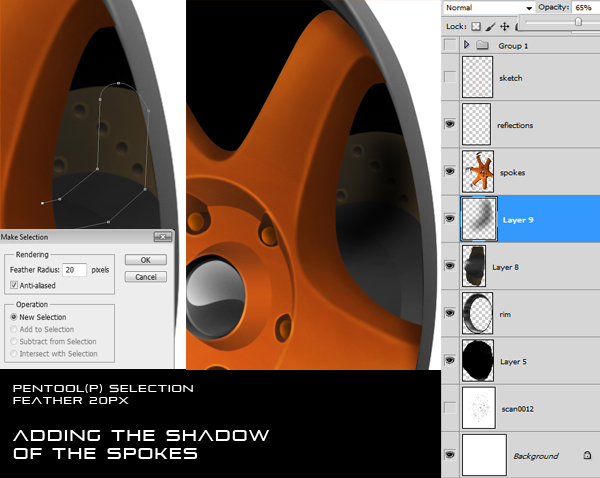 Step 29The rim is almost done now. We’ll just make some small light reflections now. To do so, we start by creating a long an narrow reflection, using a path. When creating the path, make the middle part a bit thicker. Use a 1px feather when making the selection. Take the Brush Tool, set it to 100% opacity, and choose about 50px width, and brush the selection. Brush a bit more in the middle part, you should get something like this. Make more of these reflections on any edges that are in light. 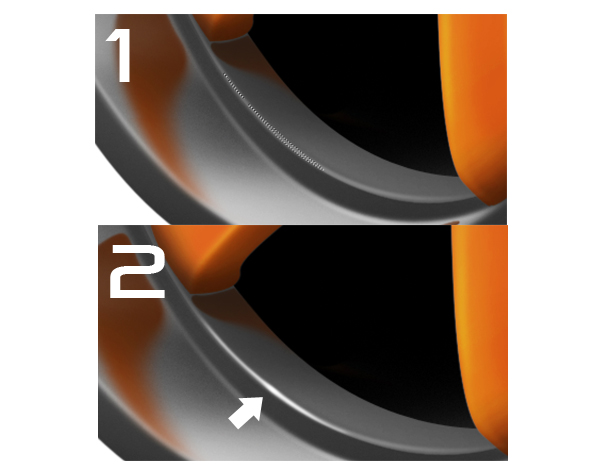
Final Image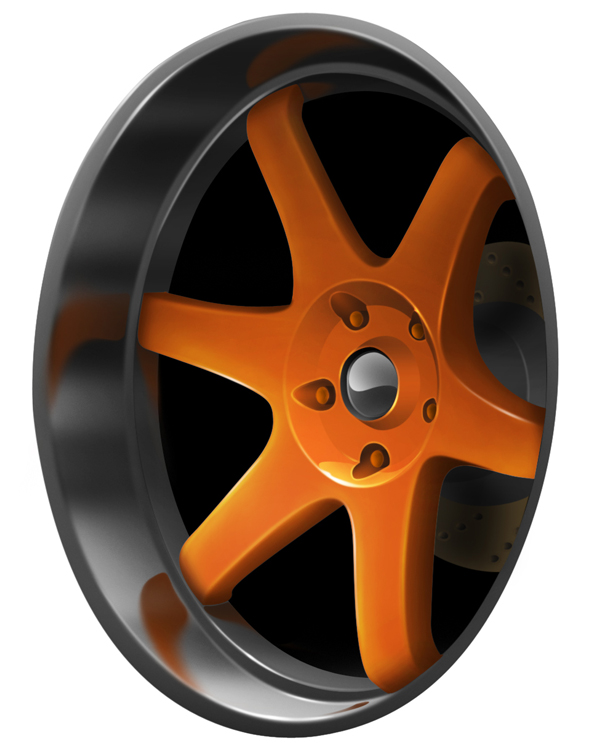 Step 30 (Optional)Place the new wheel on top of an image of a car. 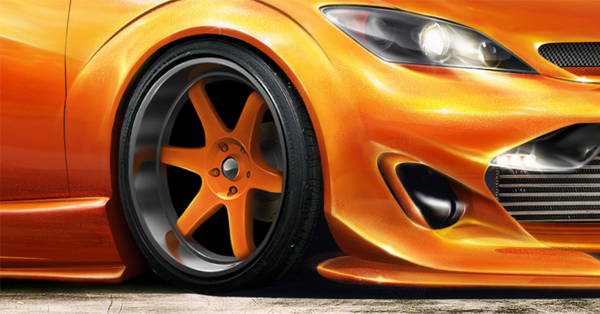 Тэги: illustrate
Главная / Главные темы / Тэг «illustrator»
|
Категория «Телевидение»
Взлеты Топ 5
Падения Топ 5
Популярные за сутки
|


Загрузка...